Dreamfactory Service Platform
DreamFactory DSP
The DreamFactory Services Platform (DSP) is a powerful open-source mobile services platform that provides all
the back-end infrastructure required to build cutting edge enterprise applications for the desktop, tablet,
or phone. All of your services are accessed through a REST interface that supports both JSON and XML
documents. This style of document exchange interface is perfect for HTML5 applications or native client
technologies like iOS. Here are a few of the key features provided by every DSP.
Admin Console - Each DSP comes with a built-in admin console for managing all aspects of the
DSP including applications, users, roles, and services.
Application Hosting - A DSP can host any number of applications. Each application is similar
to a mini web site. You can easily upload and manage each application's files and folders from the admin
console.
User and Role Management - The DSP takes care of user management, single sign-on, and user
roles. You can define roles to control user access to applications, database tables, and services.
SQL Services - Your DSP provides a comprehensive and secure connection to a dedicated SQL
database. You have services for Create, Read, Update and Delete, as well as complex filtering and a complete
suite of metadata services. The ability to query across object relationships is supported.
BLOB Storage - Your DSP provides interfaces to all of the major BLOB storage systems
including S3 and Azure BLOB. The master credentials to each service are hidden by the platform and users are
granted access through single sign-on.
External Integration - Your DSP can provision any number of integration points for external
services such as email, NoSQL data, and remote BLOB storage. These services hide master credentials on the
platform and can be administered by user role.
Developer Features
CORS support
Developers prefer to write codes in an environment they are familiar with where debug tools and test suites are
readily available. By enabling CORs support a developer can run apps from outside their dsp and still
leveragethe power of our REST API.
To Enable CORS support log in to your DSP and click on the System Config menu item on the left hand side. On the
System Config screen you will see the CORS Access options. Setting * will allow you to work from your desktop or
anywhere. You may also use your localhost server, or another DSP or remote server you wish to have access to
your data or service. Having the allowed verbs checkboxes enforces another layer of access control by locking
down the entire DSP to use only the verbs checked for CORS.
To use CORS without logging in, you will also have to allow for Guest Access, and create a Role for guest user
access. This way you can limit any guest access to only database tables or services you see fit.
If you’d like to pass authentication instead of having a guest role, consult our Swagger API docs here for the
latest API call for logging in a user (see the /user/session POST request). That POST will return a session_id
that you can pass as a new header called X-DreamFactory-Session-Token with all your future API requests. You
will also need to include the API name you created with your application as X-DreamFactory-Application-Name if
you haven’t already.
NoSQL Access
No SQL Highlights
Securely store any credentials required to access your storage on the server-side, relieving your app from
maintaining it.
We remove any cross-site hoops your app would have to handle by making it a “native” REST service on the
DSP.
Provide a common, fully REST-based API to each of the supported NoSQL service types and use a common data
format layout, using JSON, for data entry and retrieval.
We also provide a common SQL-like filtering language, making it dirt simple to find the data you need.
Overview
Each flavor of NoSQL has a unique way of defining how data id stored. Azure calls them “tables” as does AWS,
that is for DynamoDb, but for SimpleDb, they are called “domains”. For CouchDb, they are called “databases”,
not to be confused with MongoDb's “databases” which stores your data in what they call “collections”. While
each vendor calls them something different, we will refer to them collectively as “tables”. These are the
things that group your sets of data together or partition them, however you seeit. You can actually manage
most aspects of the table administration through the REST API.
Currently, each DSP supports Amazon Web Services' SimpleDB and DynamoDB, Windows Azure's Tables, MongoDB and
CouchDB.
Service Setup
To create a new NoSQL service, select services from the admin console left navigation menu. In the type
dropdown menu select NoSQL DB. Enter the Service Name, Api Name and Description. Then select the Appropriate
NoSQL Type. The required fields for each NoSQL Type are outlined below.
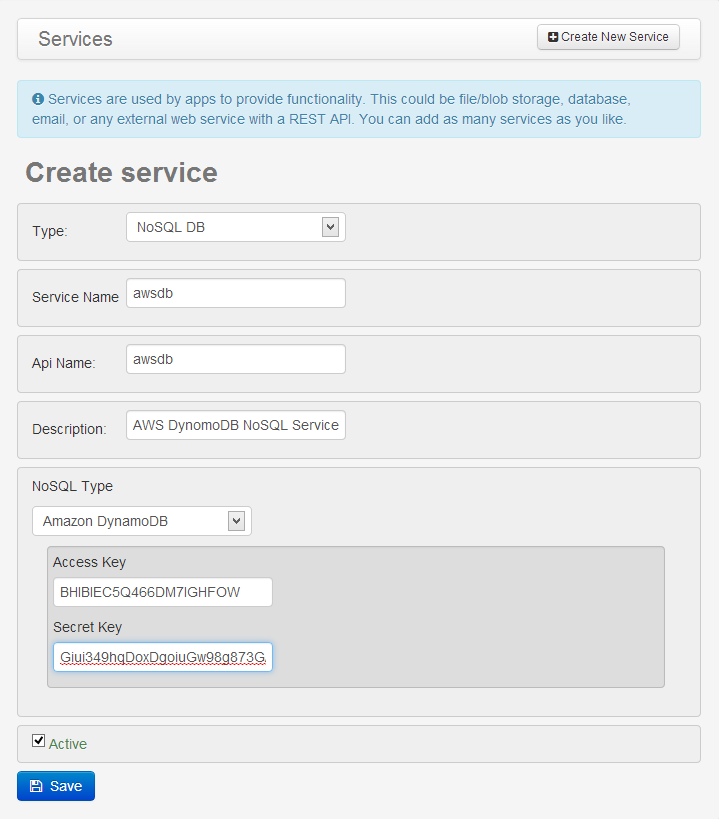
Amazon DynamoDB
To complete the setup of your NoSQL service select Amazon DynamoDB from the NoSQL Dropdown.
Enter your AWS Access and Secret Key.
Select the AWS Region that will host your DynamoDB.
Click here for instructions on locating your Access Key and
Secret Key.

Amazon SimpleDB
To complete the setup of your NoSQL Service select Amazon SimpleDB from the NoSQL Dropdown.
Enter your AWS Access and Secret Key.
Select the AWS Region that will host your SimpleDB.
Click here for instructions on locating your Access Key and
Secret Key.

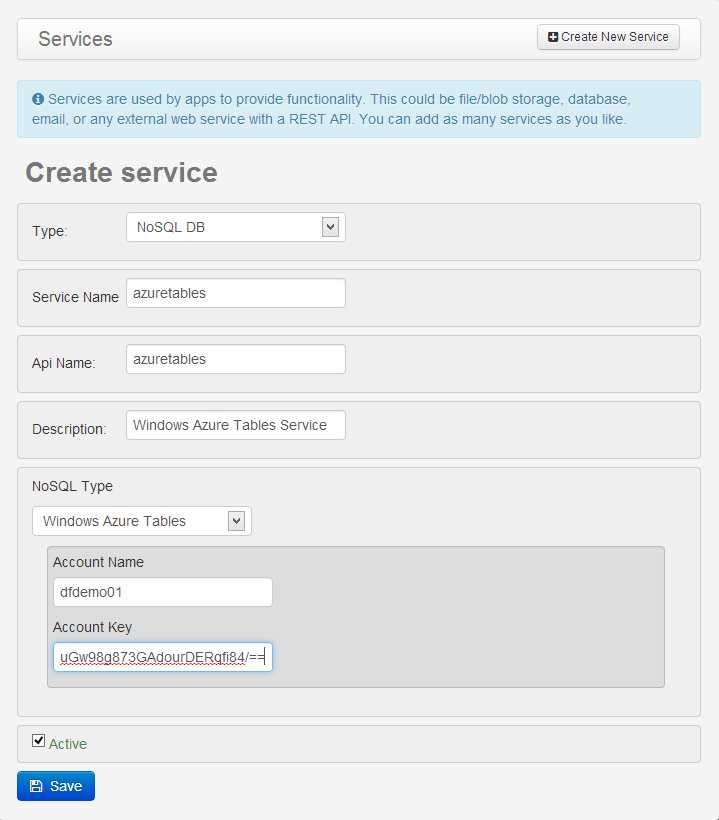
Windows Azure Tables
To setup your NoSQL service select Windows Azure Tables from the NoSQL Dropdown.
Enter your Azure Account Name and Account Key
Click here for instructions on locating your Account Name and Account
Key.

CouchDB
To setup your NoSQL service select CouchDB from the NoSQL Dropdown.
In the connection string enter the host name of your mongo instance. For example couch.dreamfactory.com; if
your CouchDB is running on a different port than 5984 you can append the port number to the host name ie.
couch.dreamfactory.com: 5984.
The Database field is the location in CouchDB where the collection you wish to access is located.
The fields username and password are optional. These values can be left blank unless they are required by
your CouchDB deployment.

MongoDB
To setup your NoSQL service select MongoDB from the NoSQL Dropdown.
In the connection string enter the host name of your mongo instance. For example mongo.dreamfactory.com; if
your MongoDB is running on a different port than 27017 you can append the port number to the host name;
mongo.dreamfactory.com:28017.
The Database field is the location in MongoDB where the collection you wish to access is located.
The fields username and password are optional. These values can be left blank unless they are required by
your MongoDB deployment.

Verifying your NoSQL Configuration.
The easiest way to verify your access to your NoSQL service is to use our api documentation tool, Swagger. To
access swagger press the script button next to the NoSQL service name. To explore the service in depth press
the HTTP Verb you would like to execute.
The HTTP verb 'POST' is used for creating new entities, 'PUT' is used for replacing the whole content of an
entity and 'PATCH' is used to merge in changes to an entity ('PATCH' and 'MERGE' HTTP verbs are used
interchangeably in the REST API). Also, as with the other DSP services, if your transport layer only accepts
'GET' and 'POST' verbs, using a 'POST' command while setting either a url parameter, 'method=PATCH', or a
header, X-HTTP-Method = PATCH will “tunnel” the command through properly.
Retrieving Records using Swagger
When it comes to making your NoSQL data available to your app, our REST API provides several different
methods to get just the data sets you want, when you want it. Below are the available options for a GET
request on a particular table.
The table name is sent as part of the url, while the other options are sent as url parameters. If url
parameters are not your cup of tea, you can send most of them as posted data (using POST request with
X-HTTP-METHOD = GET as mentioned earlier. Note that the “record” parameter can only be sent in this way.).
Most of them are self explanatory, but a few may need clarification.
| ids | This is a comma delimited list of unique identifiers (think primary key) values for retrieving multiple records at a time. If passed as POST data, this can also be an array of ids. In the case where they is no static identifier field (DynamoDb), use of the “id_field” parameter is necessary to indicate which field these values belong to. |
| filter | This is where you use our simple SQL-like filter string. Comparison operators supported on every platform are ' = ', ' != ', ' > ', ' >= ', ' < ', ' <= '; or as their SQL short form ' eq ', ' ne ', ' gt ', ' ge ', ' lt ', ' le '. Depending on the dbvendor, others such as ' contains ', ' like ', and ' begins_with '.Spaces surrounding the operator is required. String values on the right side of the comparison must be within single of double quotes. Depending on the db vendor, logical comparisons (AND, OR, NOT) are also supported. More on the differences in later blogs. The whole filter string must be url-encoded. |
| record | Used only in POST data, this option allows you to send partial (minimally the identifier fields) or complete records back to the database to be “refreshed” with the latest values. This is also helpful in instances where the table has multiple indexes, i.e. DynamoDb and Azure Tables. |
If we want to find the first 3 records in the zipcodes table information that have a population of over
20,000 people, returning only the city, state and percentage over 40 years of age. Here is what it looks
like in our REST API.
https://dsp-mydspname.cloud.dreamfactory.com/rest/mongo/zipcodes?filter=pop+%3E+20000&limit=3&fields=city%2Cstate%2CPopulationOver40
And this is what gets returned...
    {
    "record": [
    {
    "_id": "28659",
    "city": "NORTH WILKESBORO",
    "state": "NC",
    "PopulationOver40": 9.19
    },
    {
    "_id": "31201",
    "city": "HUBER",
    "state": "GA",
    "PopulationOver40": 99.877
    },
    {
    "_id": "71291",
    "city": "WEST MONROE",
    "state": "LA",
    "PopulationOver40": 80.099
    }
    ]
    }
Updating and Merging Into Records
The same array of records or a single record format with changes is supported for updating records. Using the
PUT HTTP verb as mentioned above will replace the whole record with the posted data if found by matching
identifiers in the record.
PUT https://dsp-mydspname.cloud.dreamfactory.com/rest/mongo/zipcodes
    {
    "_id": "29684",
    "city": "STARR",
    "state": "SC",
    "pop": 2890,
    "PopulationOver40": 79.4
    }
If you only want to merge changes into a record without having to reset everything, then use the MERGE or
PATCH HTTP verb and send only the changes along with the identification fields.
PATCH https://dsp-mydspname.cloud.dreamfactory.com/rest/mongo/zipcodes
    {
    "_id": "29684",
    "pop": 2890,
    "PopulationOver40": 79.4
    }
If you only want to update or merge data for one record, and it can be identified by a single key field, then
you could also add the id to the end of the url, and pass only the fields that require change.
PATCH https://dsp-mydspname.cloud.dreamfactory.com/rest/mongo/zipcodes/29684
    {
    "pop": 2890,
    "PopulationOver40": 79.4
    }
Two other methods of merging data are by id list or filter (using “ids” or “filter” url parameters mentioned
above for retrieving records). In these cases, if not natively supported, the server will query the table
for the filtering results, merge in the record changes and push the changes back in an update request. This
is an easy way of updating multiple records with the same field-value changes.
Deleting Records
Deleting is similar to updating records but no posted data is required.
Authentication Providers
Dreamfactory DSP Free edition now has the ability to authenticate users to using Facebook or GitHub using our open registration feature.
Here are the steps to enable this feature :
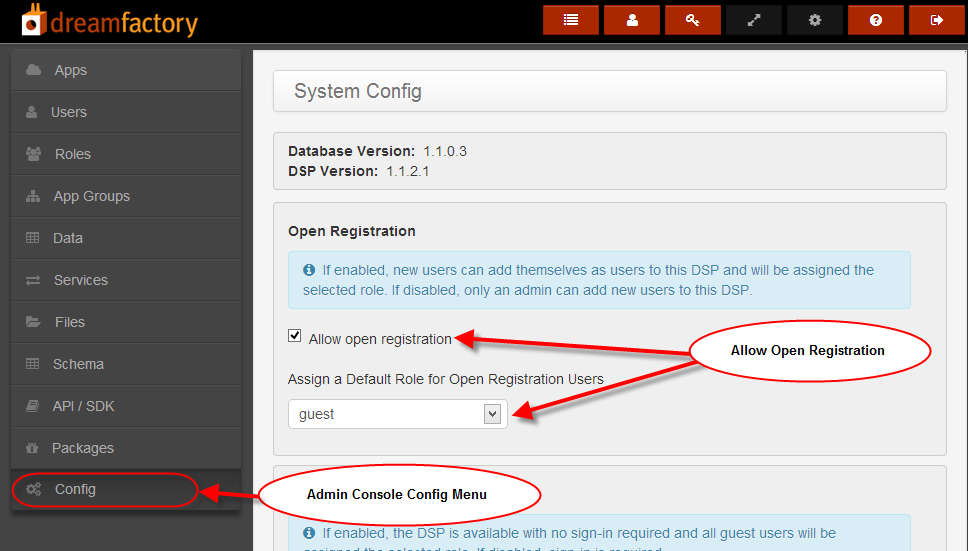
Log into your DSP and access the Config menu in the DSP admin console.
Under Open Registration check the box allow open registration and assign a role to the users who will authenticate using open registration. (When you enable open registration anyone can create an account on your DSP. Please verify that the role has the appropriate rights to your DSP.)
The next time you log onto your DSP you will see two icons for Facebook and GitHub.
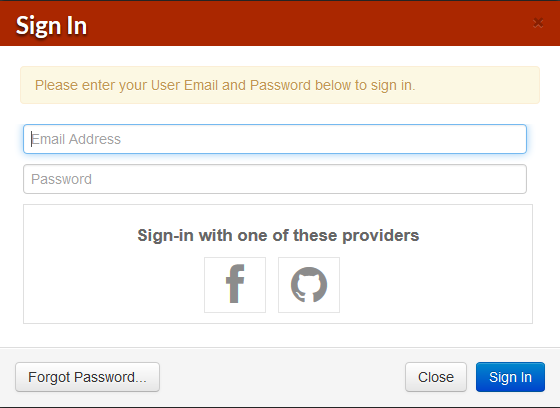
Click on the provider icon to enter your Facebook or GitHub credentials to authenticate.
Once you have logged into the DSP with your external provider you will see your Facebook or GitHub account under the user tab of the Admin Console.
From the User menu you have the ability to change the role of the user. For example, if you would like to use your GitHub account to login to the DSP as an administrator, select your GitHub account from the Users menu then select the checkbox “this user is an administrator”, then press save.
This feature is only available in the hosted Free DSP available at http://www.dreamfactory.com. This feature will be available in all DSP versions in the near future.
Remote File Storage
The Remote file service allows a developer to connect to external storage providers to store and retrieve
files. The following storage providers are available: Amazon Simple Storage Service (Amazon S3), Windows
Azure Storage, rackspace Cloud Files and OpenStack Object Storage.
Remote File Service Setup
Once you’re in the DSP Admin Console, click on the Services menu. Then click on the “Create New
Service”
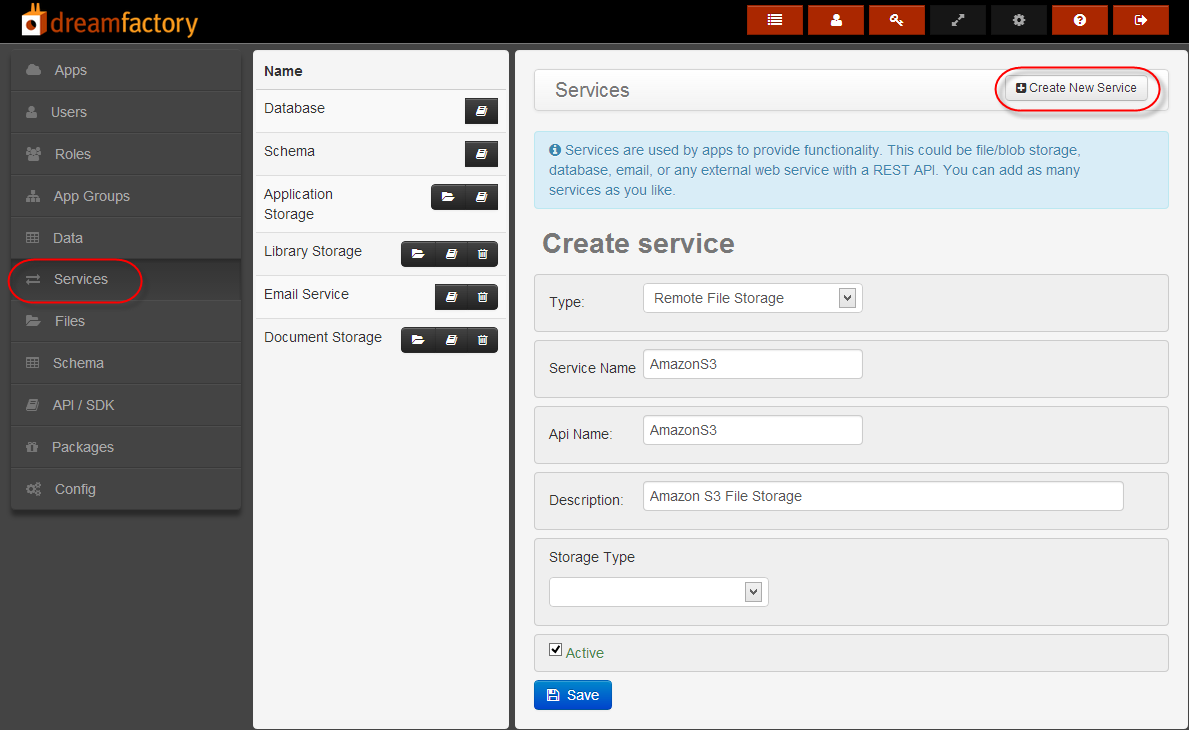
Then enter information about the service.
In the Type dropdown select “Remote File Storage.”
Enter a Service Name. The Service Name will be displayed in the Admin Console. You can edit the service
later after you’ve created it.
Enter an API Name. The API Name will be used when making REST calls within the DSP.
Enter a Description of the service (optional).
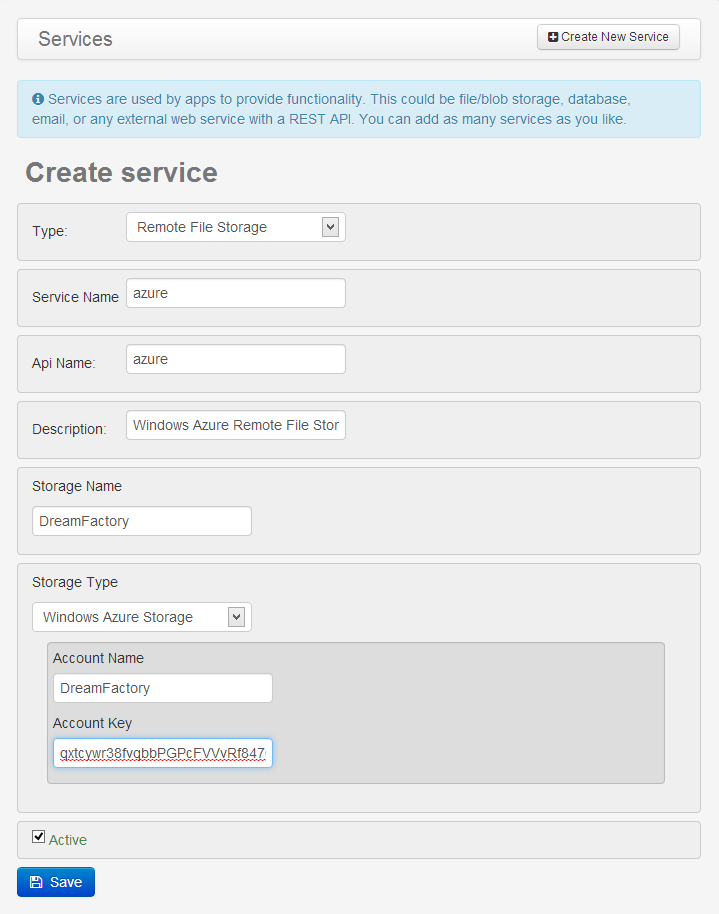
In the Storage Name field enter the folder name where your content is located on either Amazon S3 or
Windows Azure.
In the Storage Type dropdown, select either Amazon S3 or Windows Azure. See the directions below for
adding your S3 or Azure key credentials.
Check the Active box to enable the service.
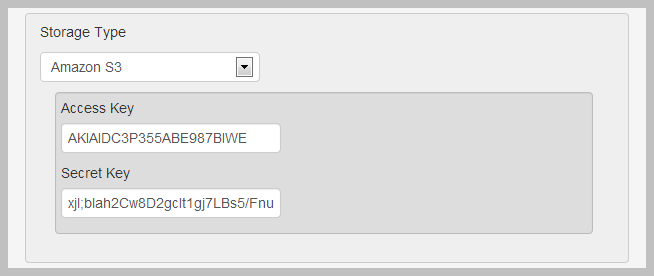
Amazon S3 Configuration
Windows Azure Storage requires an Account Name and Account Key.
Click here for instructions on locating your Account Name and
Account Key.
Windows Azure Configuration
For Amazon S3 you’ll need to provide your Access Key and Secret Key.
Click here for instructions on locating your Account Name and
Account Key.

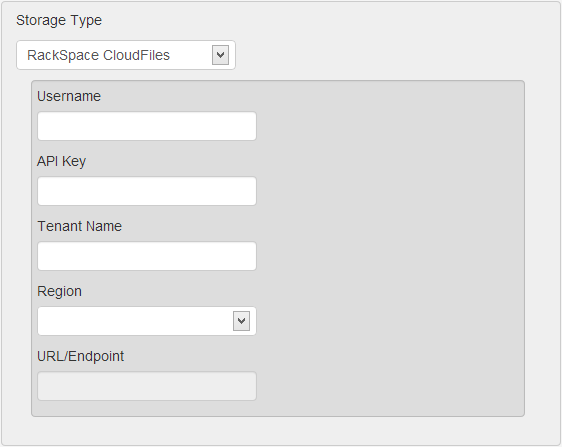
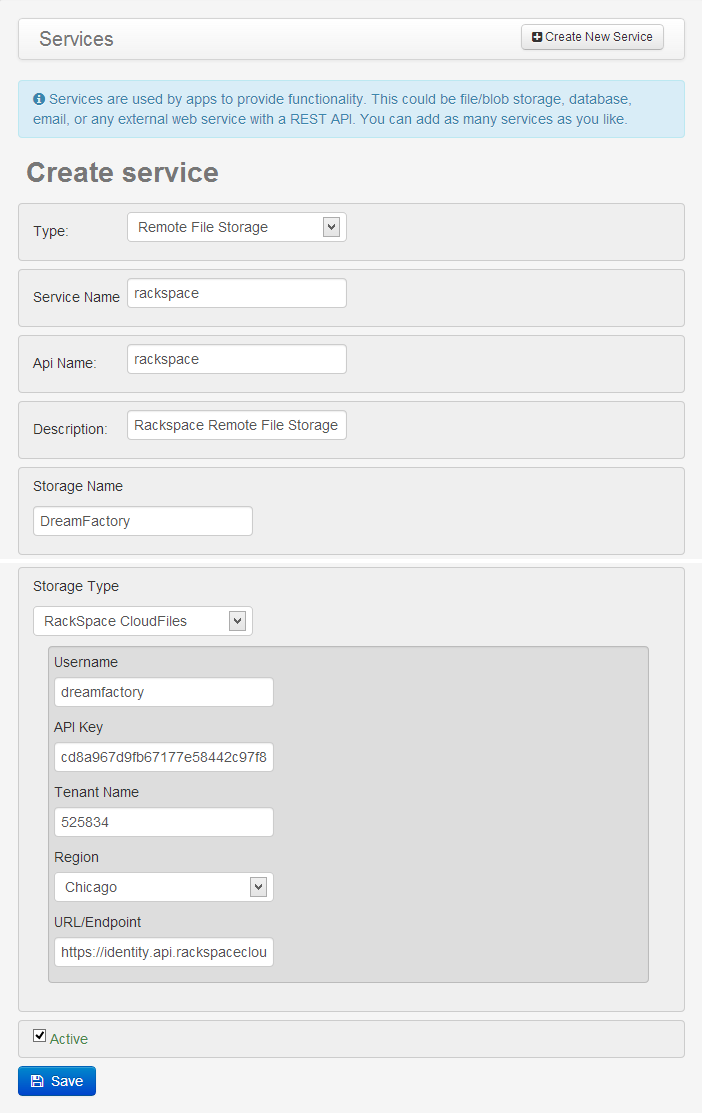
Rackspace Cloud Files Configuration
Rackspace Cloud Files requires your rackspace username, API Key, Tenant Name also known as your Cloud
Account Number, and the region where you files are stored.
Click here for instructions on locating your username, API Key,
and Tenant Name.
Test Your Connection
Now it’s time to test your connection to remote file storage. Select the Manage Files menu item in the
Admin Console. You will now see a new entry for the DSP service name you just created.
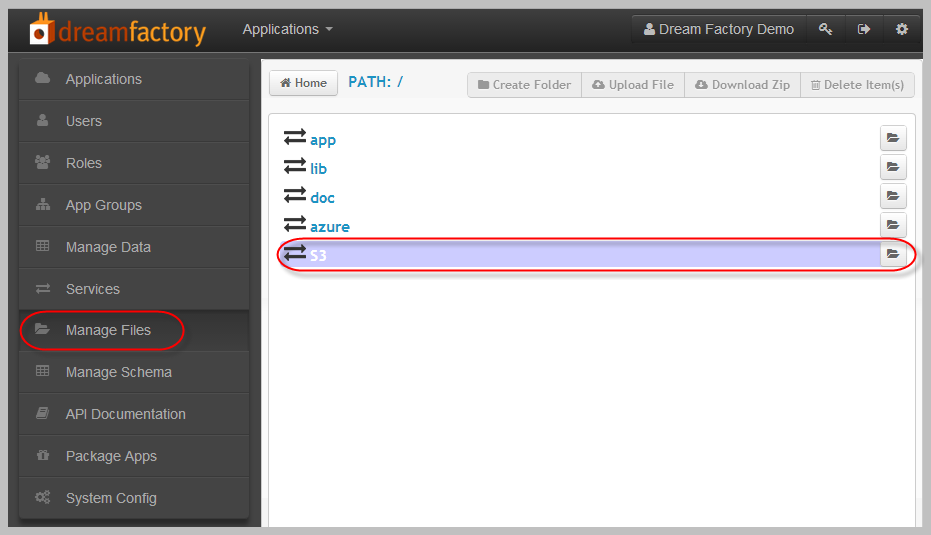
Double click on the service name to view your remote files.
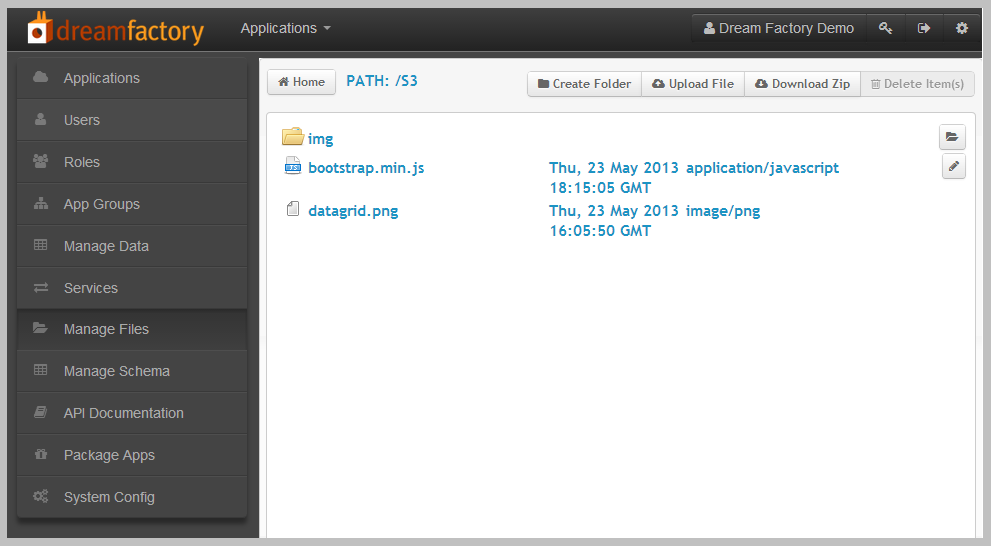
And you’re done! Now your application can access all the remote files located in the specified Amazon S3,
Windows Azure or rackspace folder.
Live Rest API
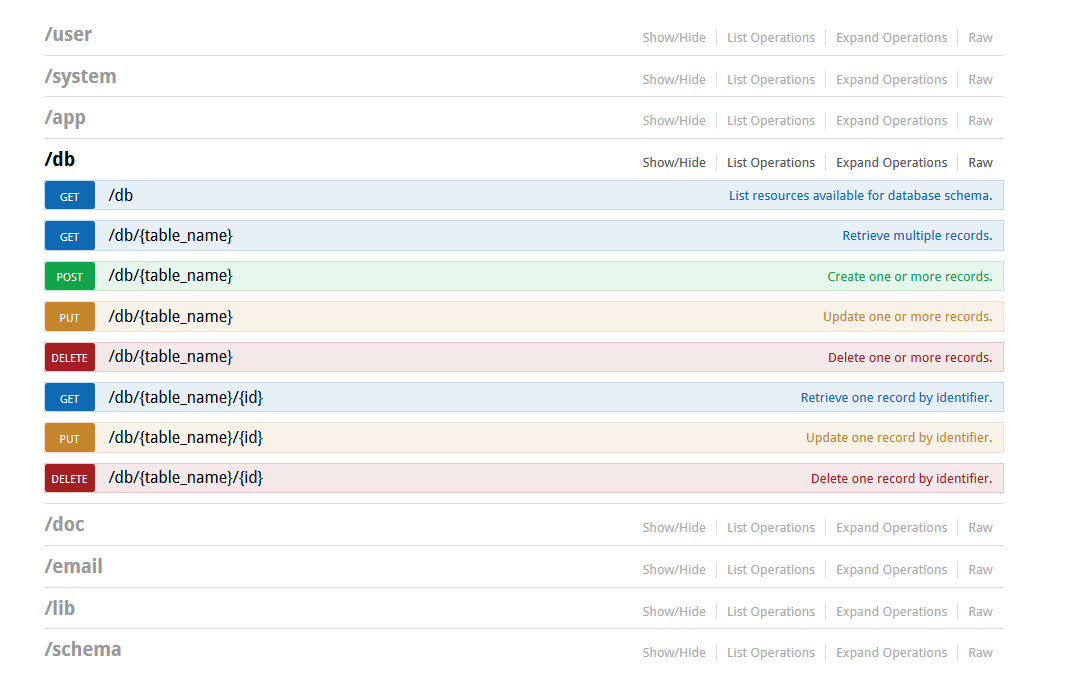
Swagger Live Rest API
Each DSP is bundled with an interactive API powered by Swagger. Swagger provides a developer with a live test
environment assists with generating client side code and is dynamic enough to update as you onboard new
services.
How does DreamFactory use Swagger?
Documenting static services of our API is as easy as annotating server-side code, just
as you would use javadoc or phpdoc. You define the API services, including path variables, query
parameters,and even members of the posted body data, along with models of any data types passed between
client and server. Documentation is then easily generated in various formats (json, xml, etc) and cached for
speedy access from clients.
Interacting with Swagger
To access the Swagger API documentation, Press the Gear icon on the top menu bar to access the admin console
then select API Documentation from the left menu bar. Each resource of the API Doc can be expanded
bypressing the resource name or the List Operations link.
DSP Free Edition
Setting Up Your DSP
To start your own DSP environment you must create a DreamFactory account. To create your account press the
Create Account button located on the DreamFactory website.
Enter the required fields to create you account
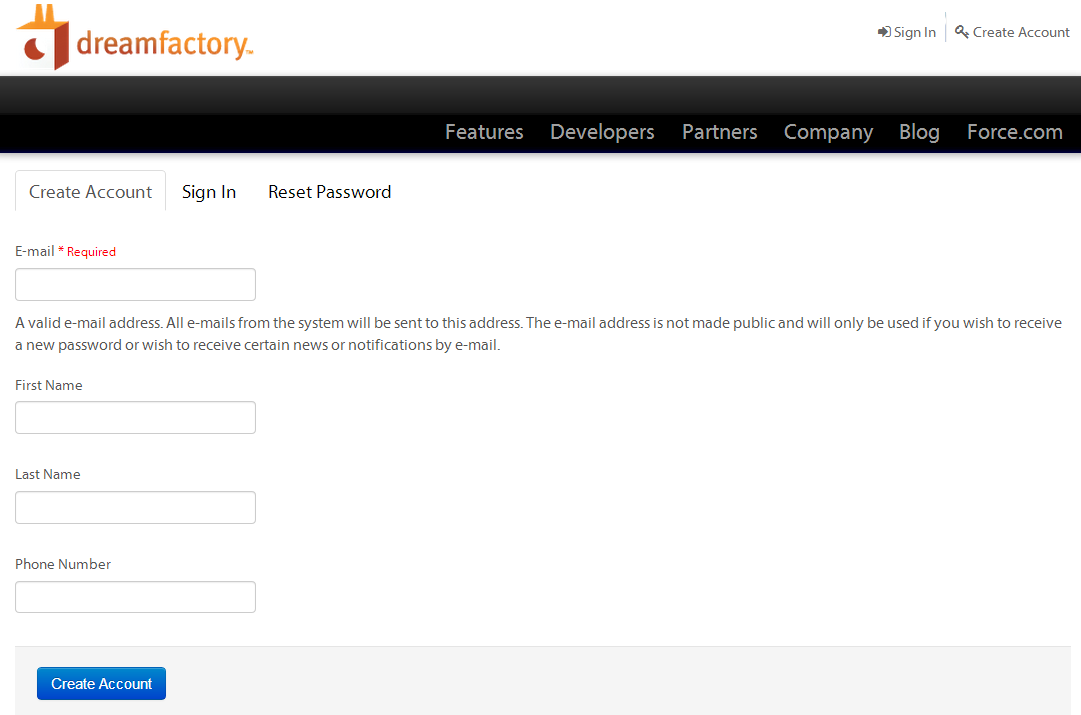
An account verification email will be sent.
Once a DreamFactory password has been set, you will see your Account Dashboard.
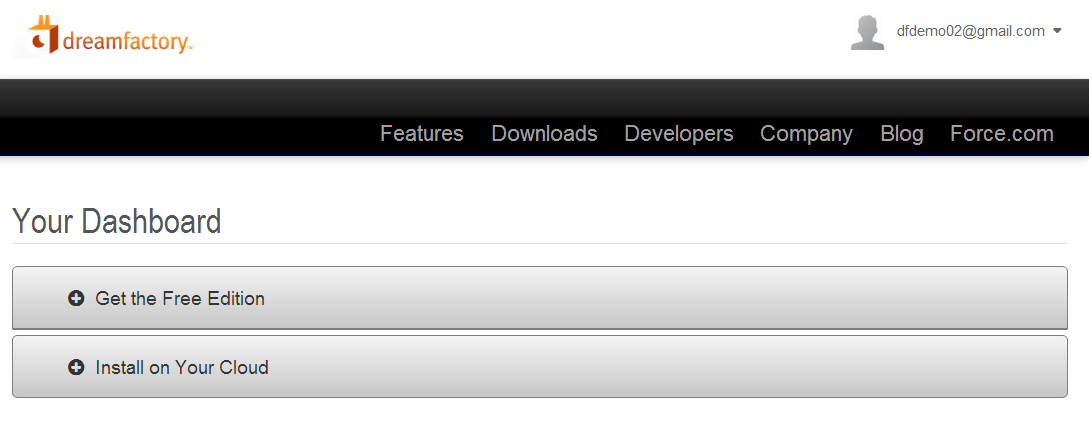
Creating Your DSP
The Account Dashboard is used to manage your DSP environment. The Dashboard menu can be accessed by logging
into your DreamFactory account.
Creating your DSP
To being setting up your DSP press the Create New DSP Button on You Dashboard.
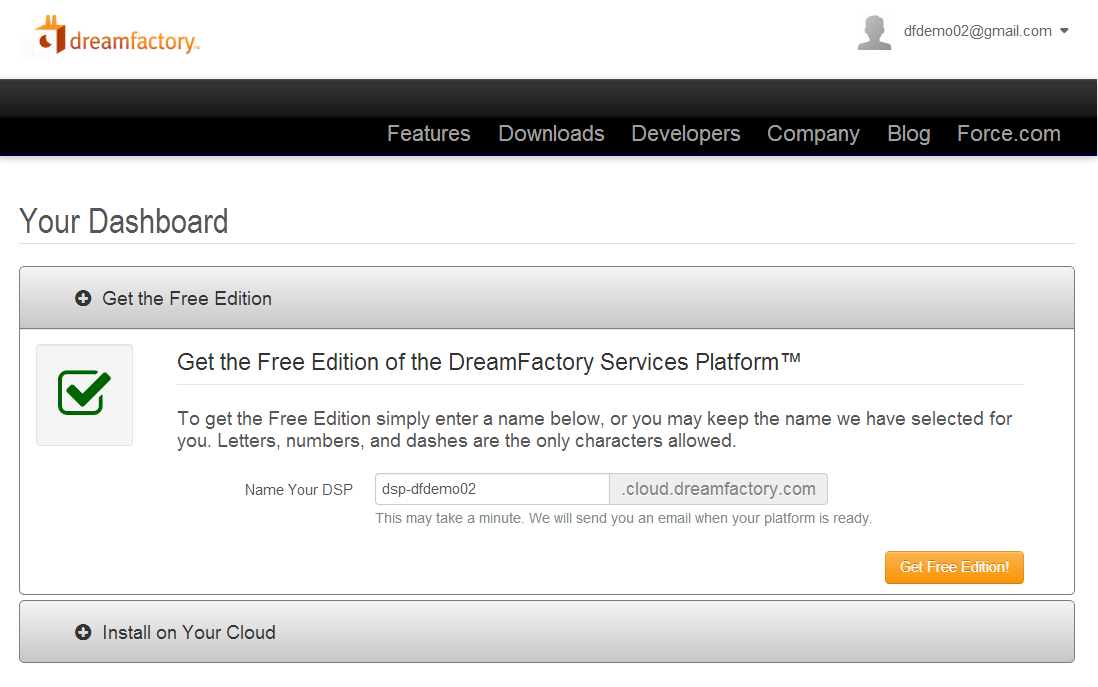
Press the Get the Free Edition button from the DSP Dashboard to being the provisioning process.
The Fully Qualified Domain Name for you DSP will pre populated, If you would like you can change your DSP
environment URL.
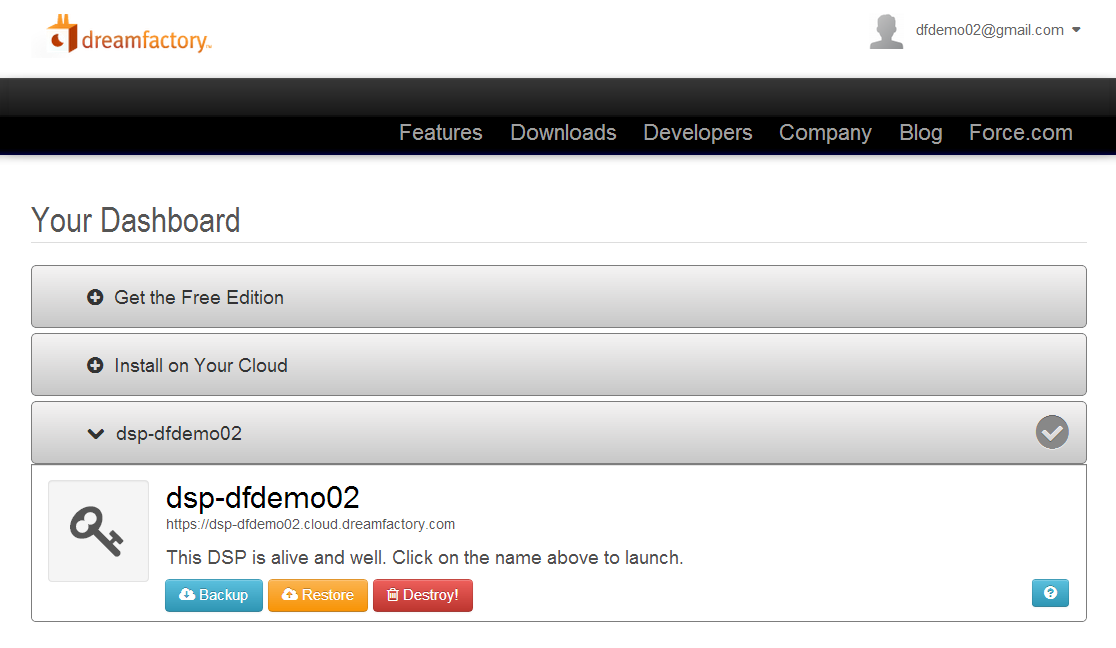
When your instance is available you will be sent an email with a link to access your DSP or you can click on
the DSP name in your dashboard. The provisioning process should be less than 5 minutes.
Getting Started with DSP
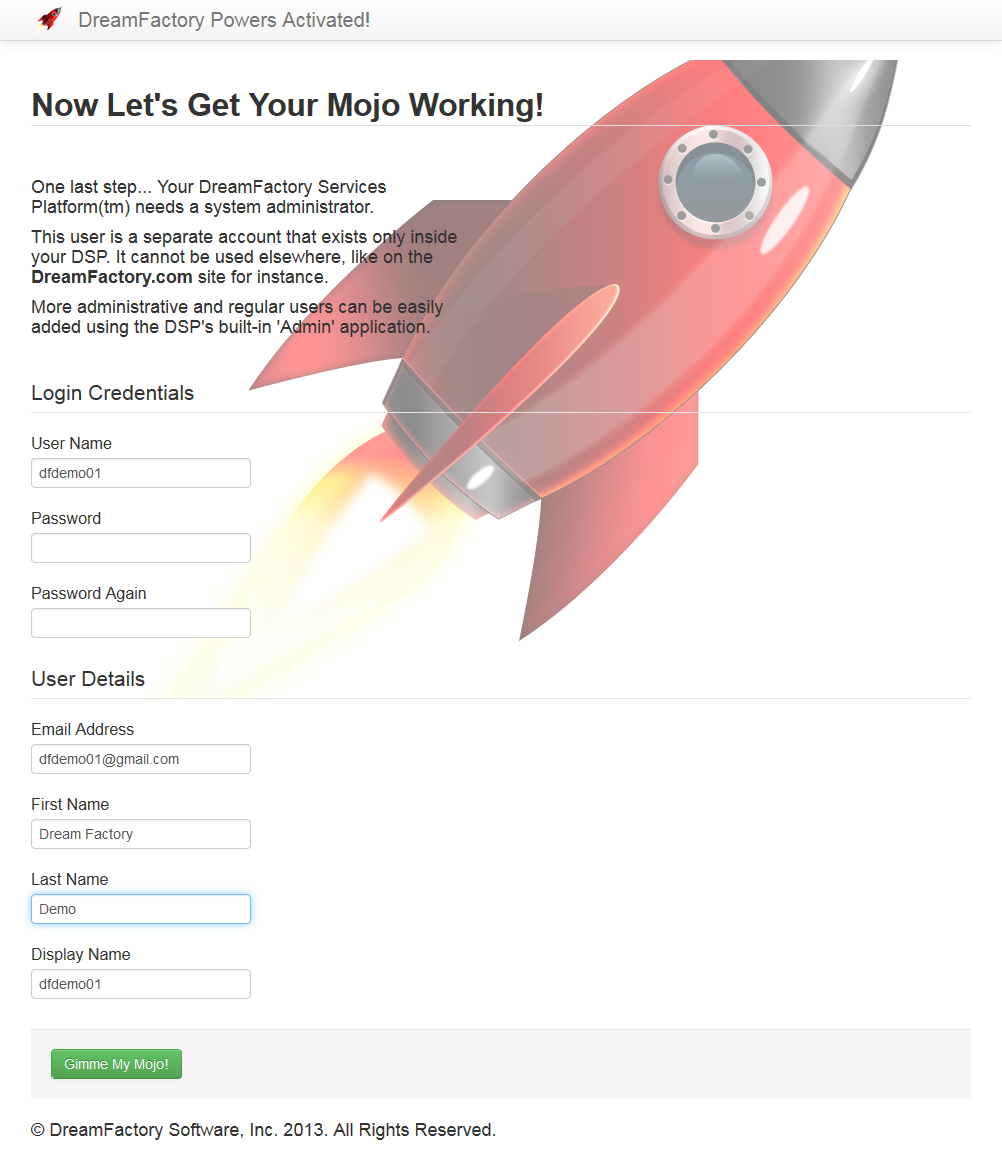
For security purposes the first step is to authenticate using your DreamFactory account.
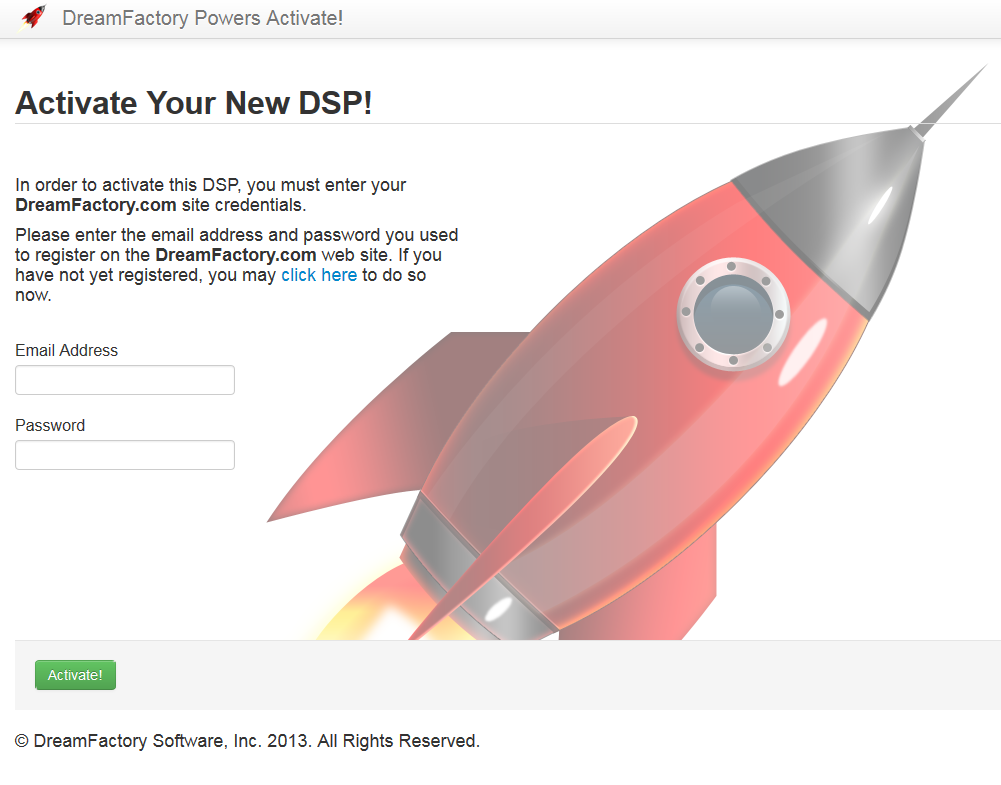
Now that you have verified your DreamFactory account you can now setup your DSP admin account. Make any
changes to the pre-populated fields and press submit.
Manage Your DSP
From the DSP dashboard each developer is able to Backup, Restore and Destroy instances. A Backup is a point
in time snap shot of a DSP, for customers who have purchased DSP there are options to migrate a DSP into
your private cloud or internal network. All other Backups are stored in the DreamFactory dashboard.
Restoring a DSP allows a user to restore a previous backup to any DSP instance.
To start the Backup process select the DSP from your DreamFactory dashboard then press the Backup button.
Follow the onscreen instructions for starting the Backup. Once the Backup is complete an email will be sent
to the developer's email account. Each Backup is stored for 30 days.
To start the Restore process select the DSP instance that will be used and press the Restore button. Follow
the onscreen prompts for restoring the backup. Please Note: This is a destructive process. You will
permanently lose any and all data associated (not including snapshots) with this DSP when you restore a
snapshot.
Destroying a DSP will permanently remove the instance from your dashboard. Once a DSP is destroyed the
instance cannot be recovered and all previous backups will be permanently deleted.
Admin Console User Guide
Admin Console Overview
The Admin Console is used to provide access the following modules: Applications, Users, Roles, App Groups,
Services, File Management and Data Management. Only system administrators should be allowed to access the Admin
Console.
To Access the Admin Console select the gear icon in the top right corner of your DSP environment.
There are three sections that make up the Admin Console interface. On the left is the Navigation Menu which
provides access to DSP Resources. In middle section is the Resource List which shows the resources that have
been created for each menu item. Finally to the right is the Resource Workspace which is used to create and
update resources.
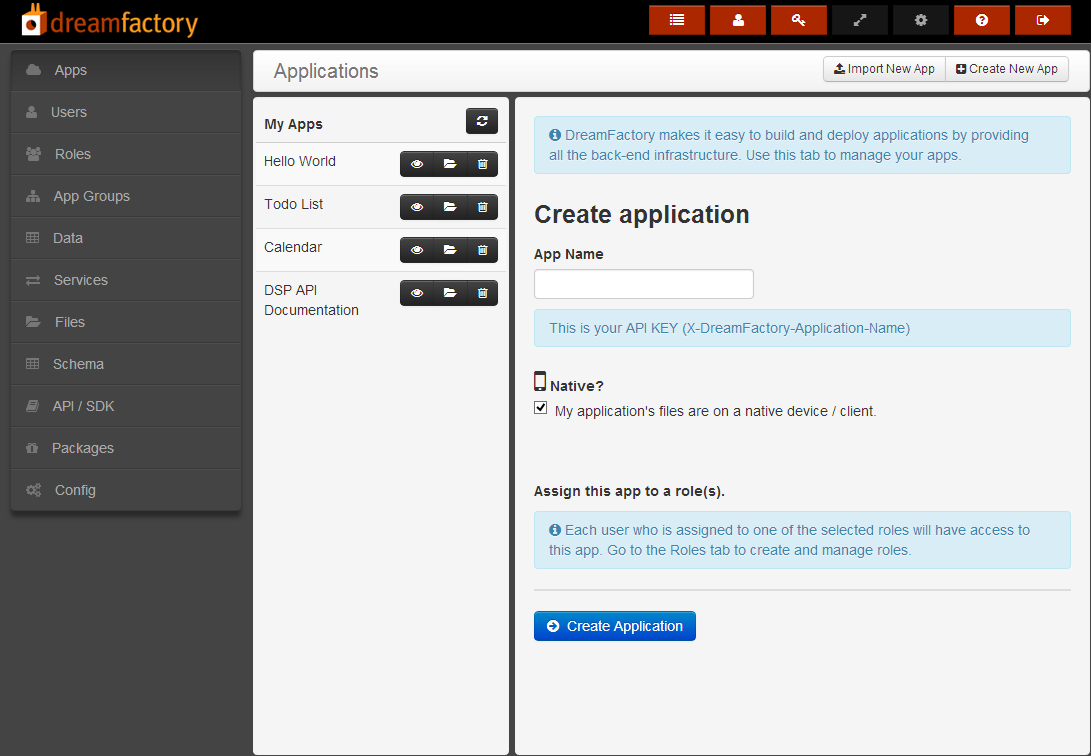
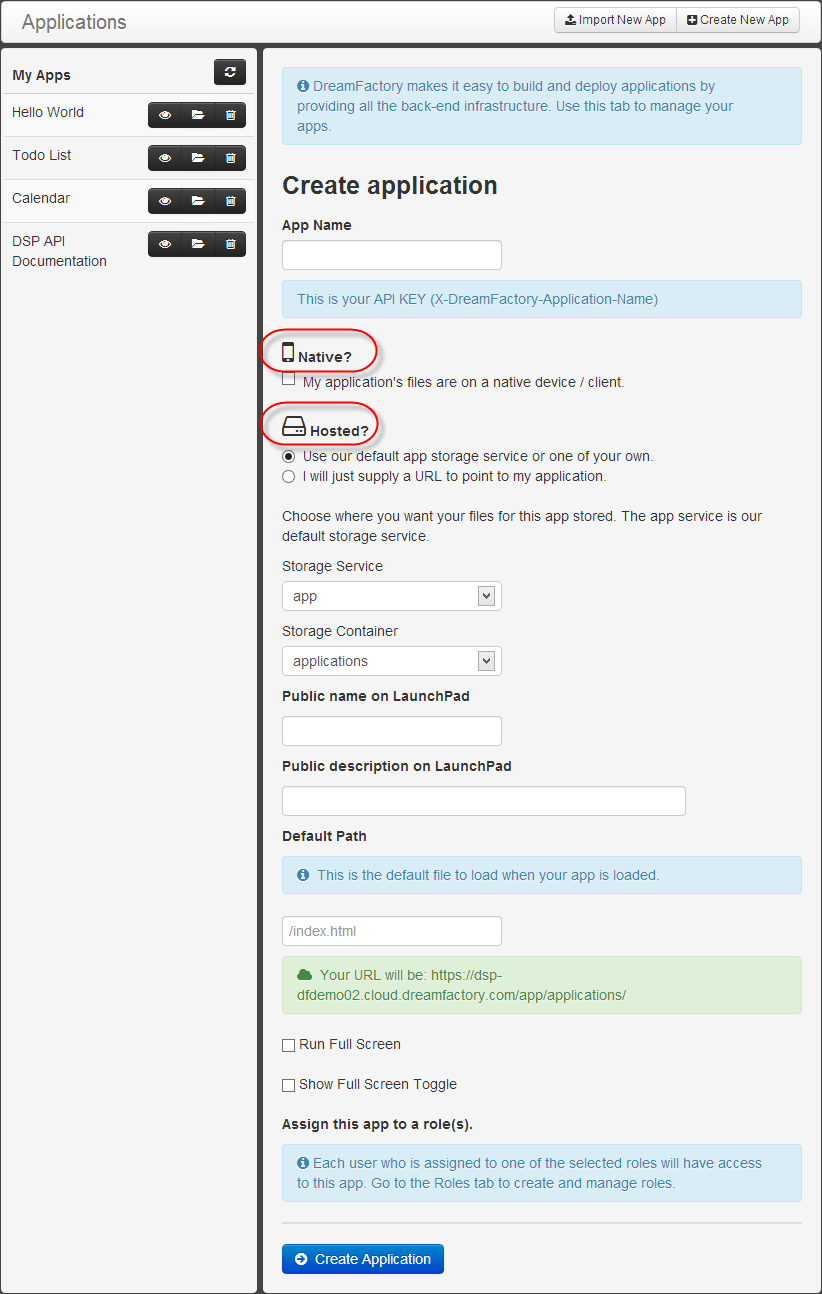
Applications
Sample Applications
To gain an understanding of how applications work inside of your DSP we have included sample applications. These
applications provide a basic overview of the functionality of the DSP and can be deleted at anytime.
If you would like to import a sample application press import application on the top right corner of the screen.
Then select the application from the list that is shown on the screen. Finally press the import button.
If you have downloaded a dfpkg file from our GitHub page to your local file system you can import the application
by browsing to the source file, then pressing the import button.
Native Applications
Native applications use the DSP to access the rest system but all of the application’s files are located on the
device or client.
Hosted Applications
Application can use your DSP to host all of the application files. Files can be uploaded to the application using
the DSP’s File manger.
If you have an application that is hosted on one of your existing web servers you can configure your DSP to
communicate with this environment by entering the URL of your application.
Users
Each DSP environment is bundled with a user management component. This allows the developer to focus on building
applications instead of creating user management components. The user management interface can add a new user,
make changes to an existing user or reset a users password. Currently a user can only be assigned to a single
role.
Creating and Managing Users
To access the User menu select User from the Navigation Menu, then Press the Create New User button on the user
Workspace, next begin entering the user details. The required fields are highlighted in red as you enter the
user account details. If the user is a system administrator they will be provided access to all applications in
the DSP. When creating your user there is an option to assigning a user a to a role.
Once you have entered the user details press the Save Button.
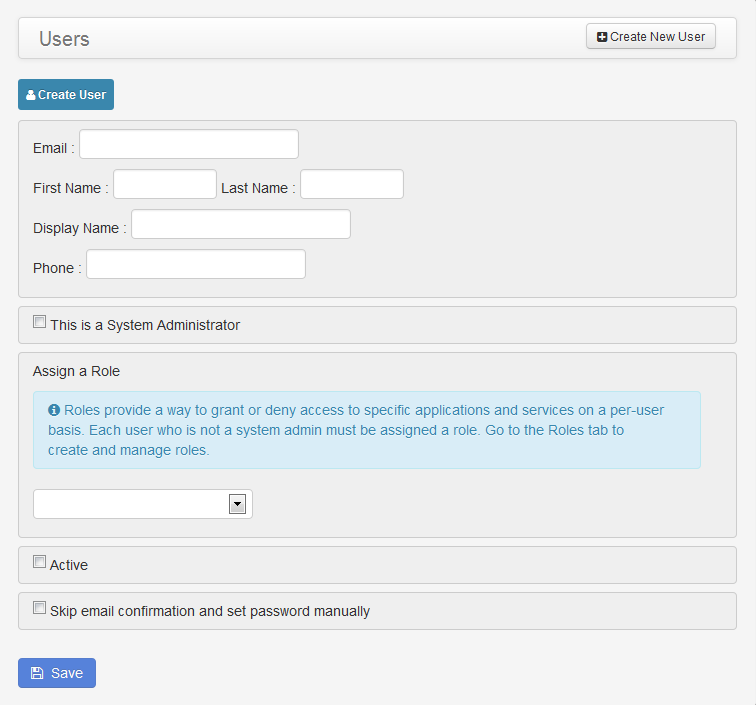
Public Name and Description are displayed to users in the DSP application.
Updating Users and Changing Passwords
To update a user select the user name from the user list press the edit button. Make the appropriate changes and
press the Update user button.
Deleting Users
From the User list select the user to remove and press the Delete button.
Roles
Roles are used to manage users access to Applications and Services. Since roles are assigned to users each role
can control access to a DSP Services. A role can be assigned to one or more applications and to one or more
service. The following types of rights can be assigned to a service: Full Access, Read and Write, Read Only,
Write Only and No Access.
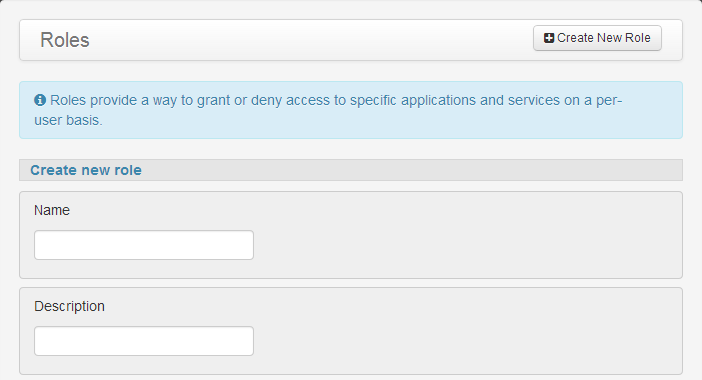
Adding and Managing Roles
To create a new Role select Roles from the navigation Menu then press the Create New Role button in Role
Workspace.
Enter the Role Name and Description
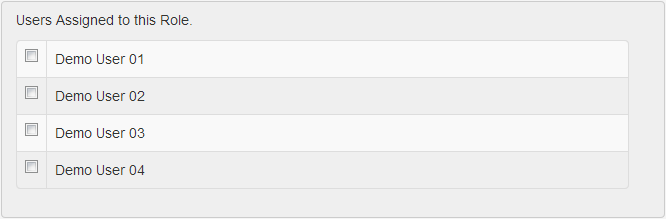
Select the users who will be a member of the Role.
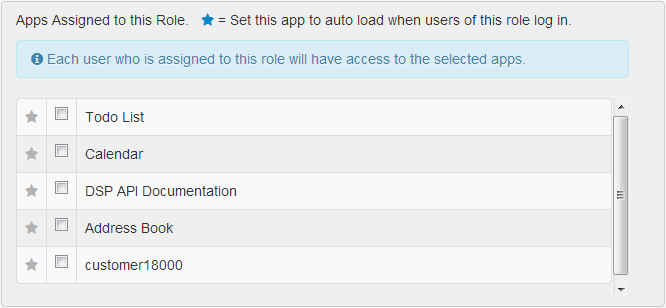
Select the Apps that will be assigned to the Role.
Assign Service Access to a Role.
Select the Service, Component and the Access level then press the Add Service Access Button.
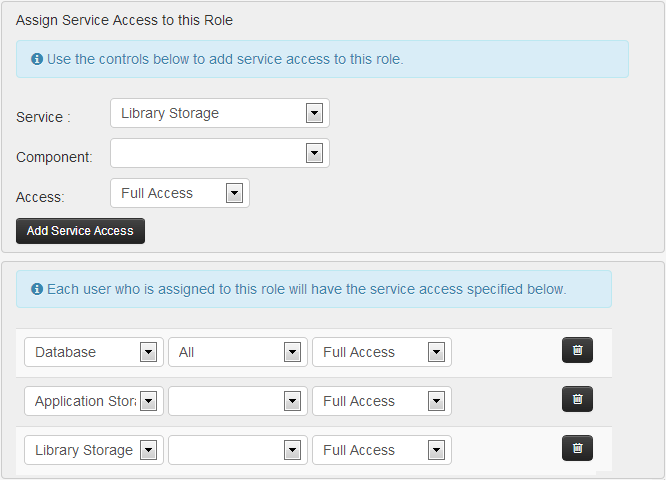
To add additional Services Select the appropriate service type then press the add Service Access Button.
If a service is added incorrectly press the delete icon to remove the service access.
Press the Save button to create the new Role.
Updating Roles
Roles can be updated by selecting the Role from the list, then editing the Users, Applications or Services
related to the selected role.
Deleting Roles
Select the Role name from the list then, press the delete icon. Confirm you would like to delete the selected
Role.
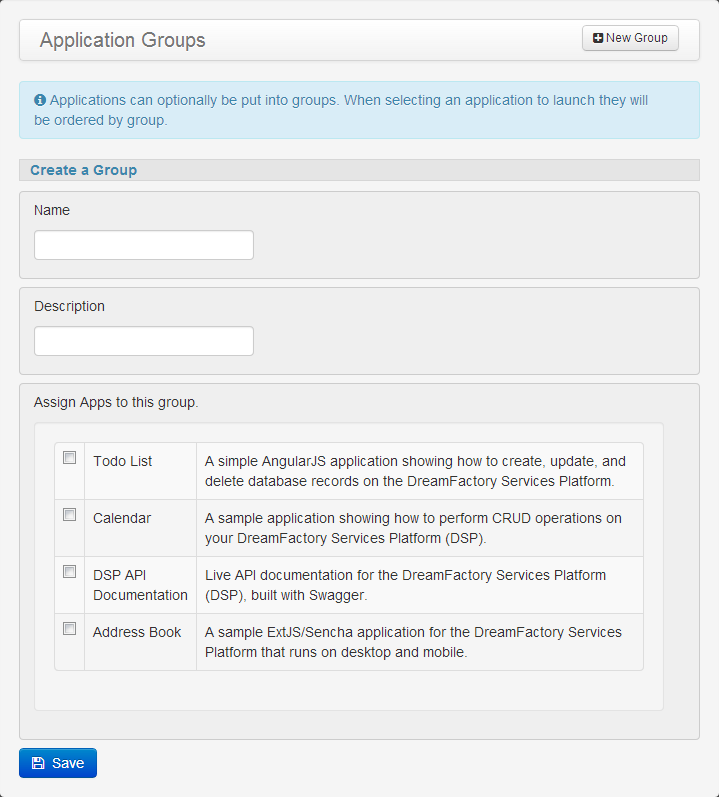
Groups
Groups are used to organize applications under a heading.
To Create a new Application Group Select App Groups from the navigation menu then press the Create New Group
button in the Admin Console Workspace.
Enter a Group Name, Description and select the Applications that will be part of the group.
Press save to create your Application Group.
Updating Groups
Select the group name from the list, add or remove the desired Applications then click Save .
Deleting Groups
Select the Role name from the list then, press the delete icon. Confirm you would like to delete the selected
Role.
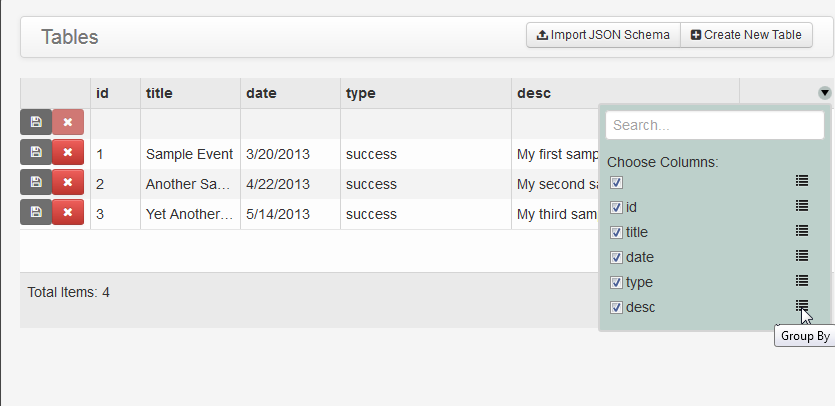
Manage Data
Data Manager allows a developer to view and edit locally stored SQL data.
From the Manage Schema workspace the admin can edit, delete, sort, search and filter your data. From the Manage
Data component select you table which will display the data editor view.
To enter a new row of data enter the data values into the first row of the table and press the save icon to the
left. To edit a field double click on the value you would like to change, enter the new value and press the save
icon. To Delete a row press the red X icon on the row you would like to delete. Data can be sorted by pressing
the column heading.To access the Search and Group data feature select the drop down arrow in the top right of the header row. To
search data begin typing in the search box. To group data select the icon to the right of the data fields.
Multiple groupings can be applied. The order of the group using a number to the right of the group button. The
check box to the left of the field name can be used to hide and show fields.
Services
DSP uses a variety of services to communicate with internal and external resources. A complete listing of available
DSP services are defined below.
Below is a list of services that can be created in your DSP. Click on the service name to view detailed instructions
on configuring each service
| Remote Web Service | Remote Web Services are used to communicate with Web Applications hosted outside of the DSP. |
| Remote SQL DB | Remote SQL DB allows a developer to connect to a database hosted outside of the DSP.. Currently we provide support to MySQL but will be looking to add the ability to connect to oracle and MS SQL server in the future. |
| NoSQL DB | The NoSQL Service allows a user to connect to a remote NoSQL DB. Currently support for Amazon DynamoDB, Amazon SimpleDB, and Windows Azure Tables are available. |
| Local File Storage | Local File Storage Is used to store files on the DSP server. Application (app) and Library (lib) are both examples of local file storage. |
| Remote File Storage | Remote File Storage allows a developer to access external storage services. Amazon S3, Open Stack, Rackspace , and Windows Azure remote file services can be accessed from your DSP. |
| Email Service | There are three types of email Providers Server Default, Server Command and SMTP. When using the Server Default we utilize the default email provider on the local machine. This is the default email provider for hosted DSP's. If your DSP is hosted on a system where you have root access you can use a server command to send emails from the DSP. SMTP can be configured to send emails using your SMTP provider using SSL or TLS authentication. |
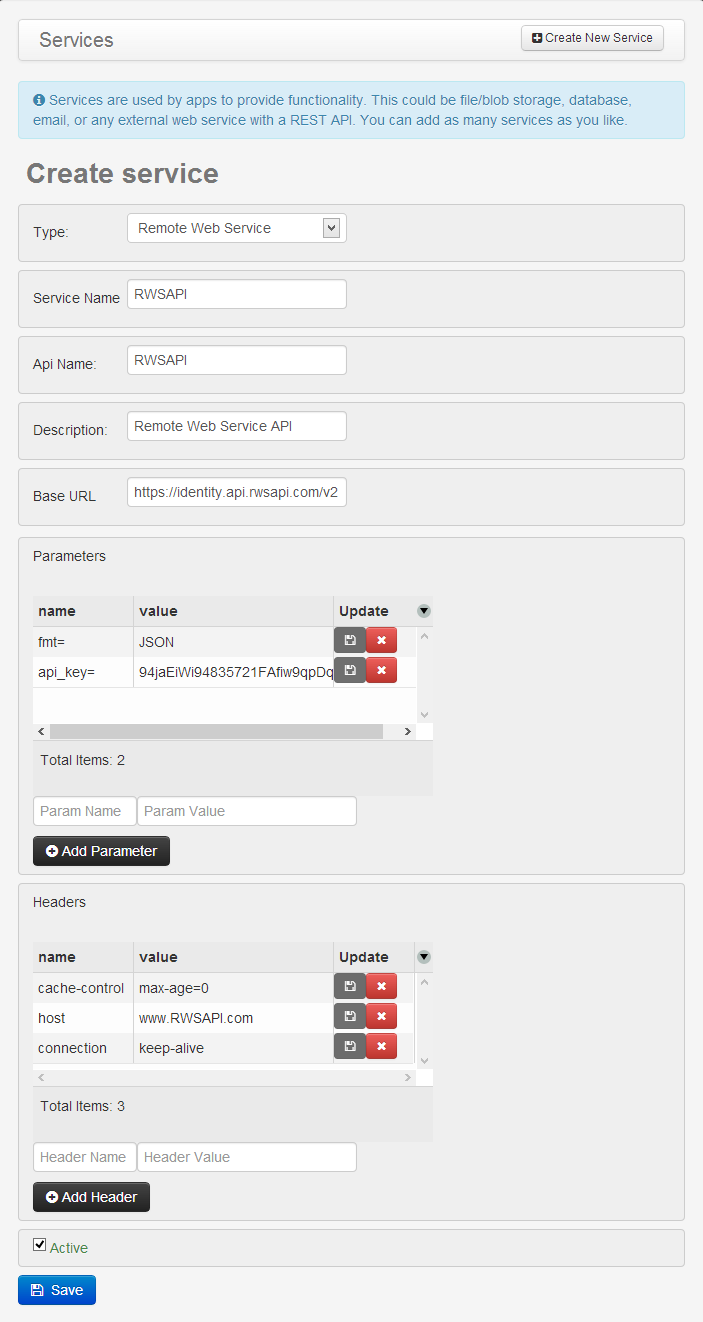
Remote Web Service
From DSP Admin Console, click on the Services menu. Then click on the “Create New Service” button.
Then enter information about the service.
In the Type drop down select “Remote Web Service”.
Enter a Service Name. The Service Name will be displayed in the Admin Console. You can edit the service later
after you’ve created it.
Enter an API Name. The API Name will be used when making REST calls within the DSP.
Enter a Description of the service (optional).
In the base URL enter the address of the Remote Web Service.
If you remote Web Service requires additional parameters or headers they can be entered into the appropriate
fields.
Check the Active box to enable the service.
To create your Remote Web Service press Save.
Return to Services
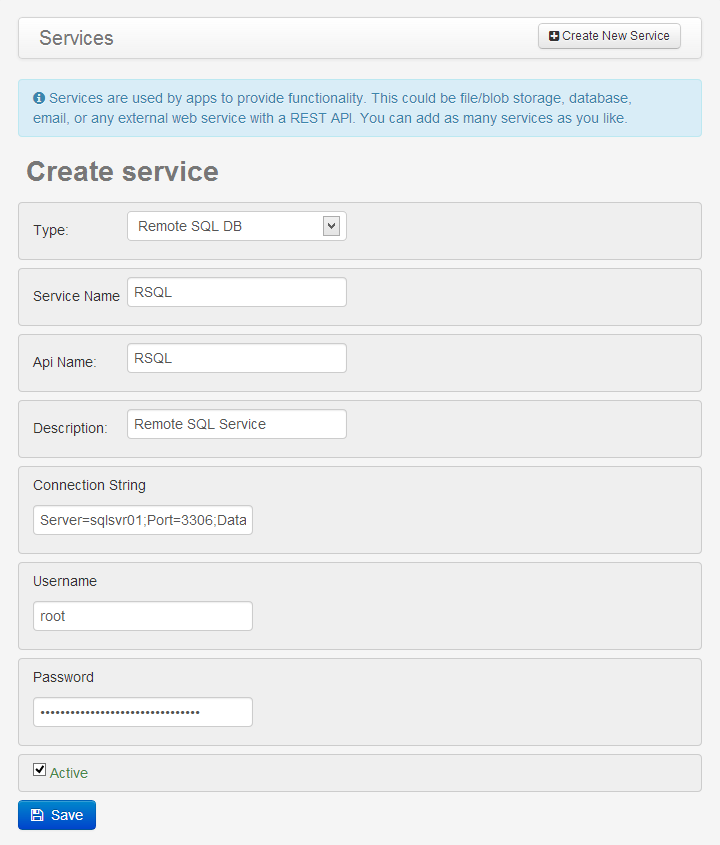
Remote SQL DB
From DSP Admin Console, click on the Services menu, next click on the “Create New Service” button.
Then enter information about the service.
In the Type drop down select “Remote SQL DB”.
Enter a Service Name. The Service Name will be displayed in the Admin Console. You can edit the service later
after you’ve created it.
Enter an API Name. The API Name will be used when making REST calls within the DSP.
Enter a Description of the service (optional).
In the field connection string enter the connection string for your remote database.
Enter the username and password for the database.
Check the Active box to enable the service.
To create your Remote SQL DB press Save.
Return to Services
NoSQL DB
From DSP Admin Console, click on the Services menu. Then click on the “Create New Service” button.
In the Type drop down select “NoSQL DB”.
Enter a Service Name. The Service Name will be displayed in the Admin Console. You can edit the service later
after you’ve created it.
Enter an API Name. The API Name will be used when making REST calls within the DSP.
Enter a Description of the service (optional).
In the Storage Type drop down, select the appropriate Amazon DynamoDB, Amazon SimpleDB, and Windows Azure
Tables.
For the Amazon DynamoDB SimpleDB and providers you will need your account Access Key and Secret Key.
Check the Active box to enable the service.
Return to Services
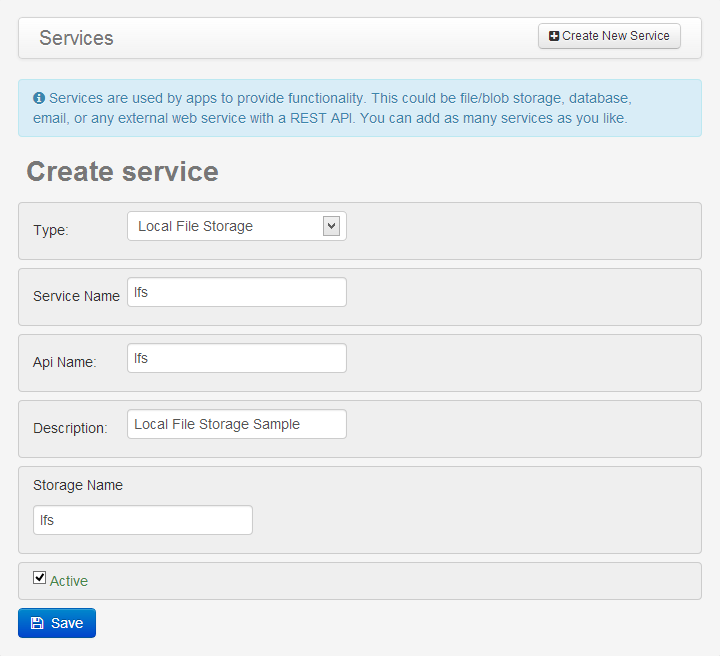
Local File Storage
From DSP Admin Console, click on the Services menu. Then click on the “Create New Service” button.
In the Type drop down select "Local File Storage”.
Enter a Service Name. The Service Name will be displayed in the Admin Console. You can edit the service later
after you’ve created it.
Enter an API Name. The API Name will be used when making REST calls within the DSP.
Enter a Description of the service (optional).
In the Storage Name field enter the desired folder name.
Check the Active box to enable the service.
Return to Services
Remote File Storage
From DSP Admin Console, click on the Services menu. Then click on the “Create New Service” button.
Then enter information about the service.
In the Type drop down select “Remote File Storage”.
Enter a Service Name. The Service Name will be displayed in the Admin Console. You can edit the service later
after you’ve created it.
Enter an API Name. The API Name will be used when making REST calls within the DSP.
Enter a Description of the service (optional).
In the Storage Name field enter the folder name where your content is located in your file service provider.
In the Storage Type drop down, select the appropriate file service.
Amazon S3 can be accessed using your AWS Access Key and Secret Key.
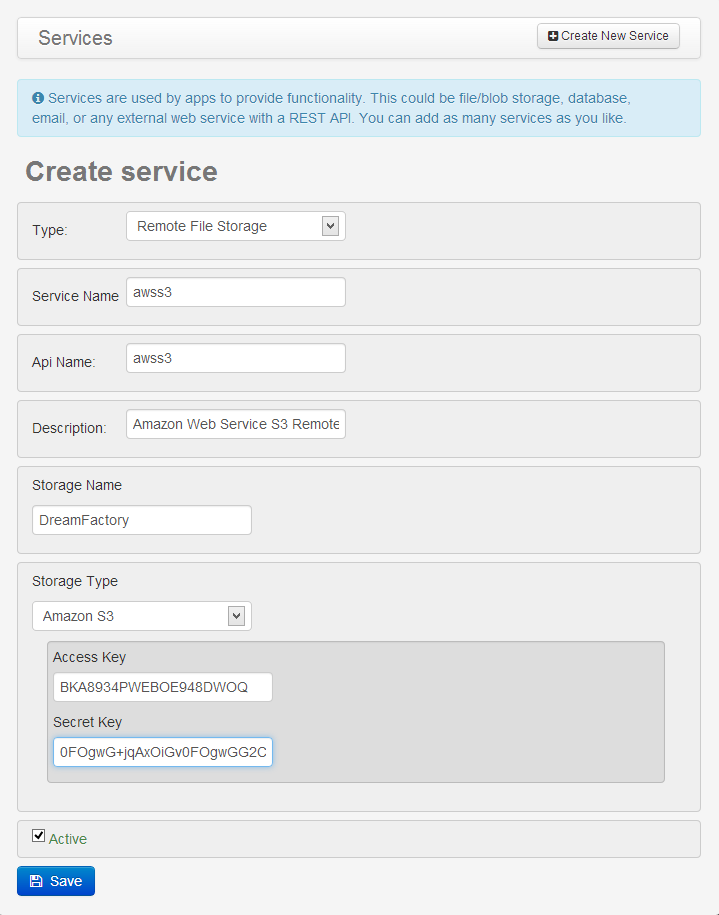
To access your Windows Azure Storage account you will need your Windows Azure Account Name and Account Key.
To access Rackspace or Openstack file storage you will need to provide your User Name, API Key, Tenant Name (also
called Cloud Account Number) and the Region where you content is located.
Check the Active box to enable the service.
To test your connection to remote file storage; Select the Manage Files menu item in the Admin Console. You will
now see a new entry for the DSP service name you just created.
Double click on the service name to view your remote files.
To create your Remote File Storage Service press Save.
Return to Services
Email Service
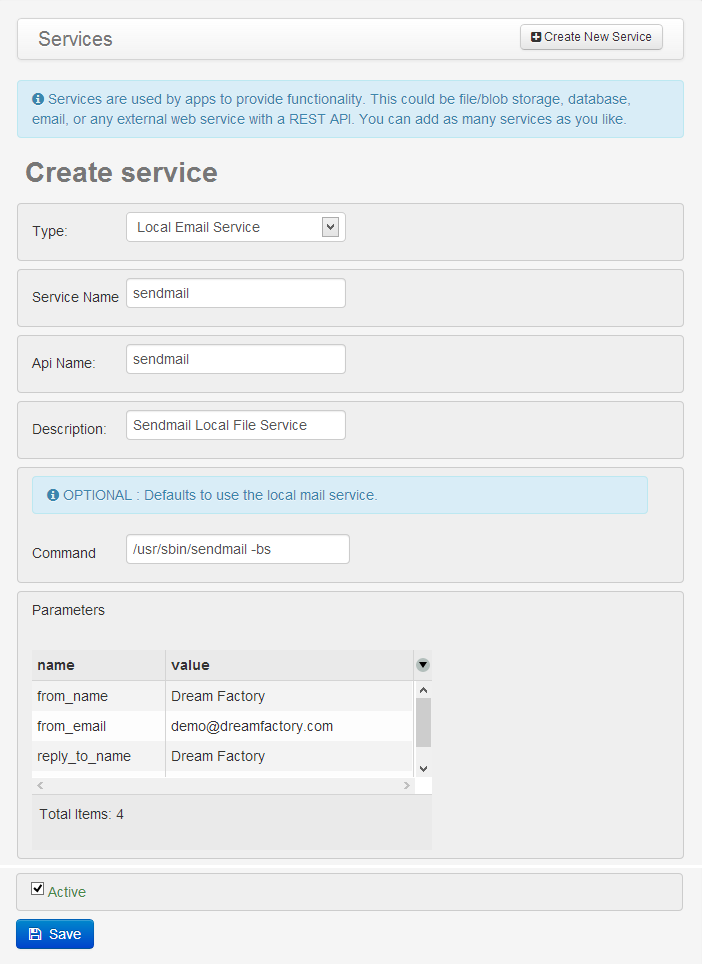
Sever Default
From DSP Admin Console, click on the Services menu. Then click on the “Create New Service” button.
In the Type drop down select "Email Service”.
Select the Provider Server Default
Enter a Service Name. The Service Name will be displayed in the Admin Console. You can edit the service later
after you’ve created it.
Enter an API Name. The API Name will be used when making REST calls within the DSP.
Enter a Description of the service (optional).
In the Command field enter the command used to execute the locally installed email service.
Complete the Parameters section. Depending on the email service you installed you may need to provide a valid
from and reply to email address.
Check the Active box to enable the service.
Return to Services
Server Command
From DSP Admin Console, click on the Services menu. Then click on the “Create New Service” button.
In the Type drop down select "Email Service”.
Select the Provider Server Command
Enter a Service Name. The Service Name will be displayed in the Admin Console. You can edit the service later
after you’ve created it.
Enter an API Name. The API Name will be used when making REST calls within the DSP.
Enter a Description of the service (optional).
In the Command field enter the command used to execute the locally installed email service.
Check the Active box to enable the service.
Return to Services
SMTP
In the example below we are using Gmail to setup the remote service.
To Crete a new service Select Remote Email Service and enter a service name, API name and a description.
From DSP Admin Console, click on the Services menu. Then click on the “Create New Service” button.
Then enter information about the service.
In the Type drop down select “Remote Email Service”.
Select the Provider SMTP
Enter a Service Name. The Service Name will be displayed in the Admin Console. You can edit the service later
after you’ve created it.
Enter an API Name. The API Name will be used when making REST calls within the DSP.
Enter a Description of the service (optional).
Enter the host name of SMTP server, the port number and select the security type either SSL or TSL.
The parameters from_name, from_email, reply_to_name and reply_to_email are required fields. Some Email providers
require that a valid account including the domain name is entered in these fields.
Finally, the username and password for the authenticated user is entered into the appropriate field.
Check the Active box to enable the service.
To create your Remote Email Service press Save.
Return to Services
Manage Files
File Manager is used to manage upload and edit files at the DSP Level. This same functionality is available at
the application level.
To create new folders press the Create Folder button and enter your desired folder name when prompted.
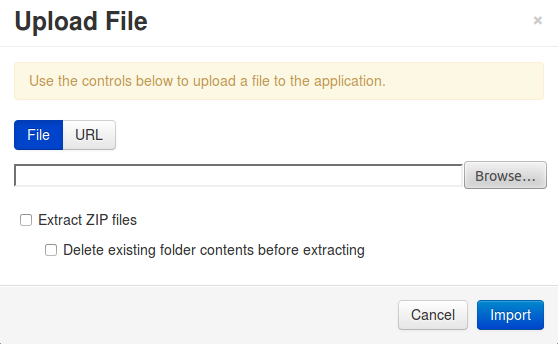
Files can be uploaded using drag and drop from your local machine, or by using the Upload File utility. To use
drag and drop select the file from your local machine and drag it into file manager. At this point you can only
drag and drop files. Individual or zip files can be uploaded from either your local machine or a URL. To upload
a file press the choose file button select the file from your local machine and press the import button. To
upload from URL Enter the fully qualified URL (http://www.dreamfactory.com/inapp01.zip) and press the Import
button. When importing zip files you will need make sure Extract ZIP files is checked. There is also a check box
to delete existing folder contents before extracting.
The file editing tool allows a developer to edit files from within a web browser with the assistance syntax
highlighting. To edit a file press the edit icon to the right of the file name.
Once the file editor opens you are able to make changes to your file and press Save. If you do not want to save
your changes press the Cancel button.
If you would like to migrate your application to a different DSP or make a backup of your application before
making changes the Download Zip utility can be used to export your data to your local machine.
Deleting items can be completed by selecting the item you would like to delete and pressing the Delete Item(s)
button. Multiple items can be selected by holding the control or shift keys.
Manage Schema
| Data Type | Description |
|---|---|
| ID/Primary Key | Defines a typical table identifier, translates to "int not null auto_increment primary key". This type requires no other properties to define the field. It presumes a "type" of int with "allow_null" set to false, the "auto_increment" and "is_primary_key" are set to true. It can only be used once in a table definition. |
| String | Defines a string field (i.e. varchar or char), defaults to a length of 255, but can be set using the "length" property. Optional properties: "allow_null". |
| Integer | Defines an integer field. Use "length" to set the displayable length of the integer, i.e. int(11) in MySQL. Optional properties: "allow_null". |
| Text | Defines a large string field (i.e. MySQL's text or MSSQL's varchar[max]), defaults to the largest length string allowed by the underlying database. Optional properties: "allow_null". |
| Boolean | Defines a boolean field, which may be represented by int of length 1, using 0 and 1 values, if a true and false boolean type is not supported by the underlying database. Optional properties: "allow_null". |
| Binary | Defines a binary string field (i.e. varbinary or binary), defaults to a length of 255, but can be set using the "length" property. Set the "fixed_length" property to true for fixed length (i.e. binary) behavior. Optional properties: "allow_null". |
| Blob | Defines a large binary string field (i.e. MySQL's blob or MSSQL's varbinary[max]), defaults to the largest length binary string allowed by the underlying database. Optional properties: "allow_null". |
| Float | Defines a standard float field. Use “scale" to set the number of desired decimal places to the right of the decimal point. Use “length” or "precision" to set the total number of digit positions. Optional properties: "allow_null". |
| Decimal | Defines a standard decimal field. Use “scale" to set the number of desired decimal places to the right of the decimal point. Use “length” or "precision" to set the total number of digit positions. Optional properties: "allow_null. |
| Datetime | A datetime field. Optional properties: "allow_null". |
| Date | A date field. Optional properties: "allow_null". |
| Time | A time field. Optional properties: "allow_null". |
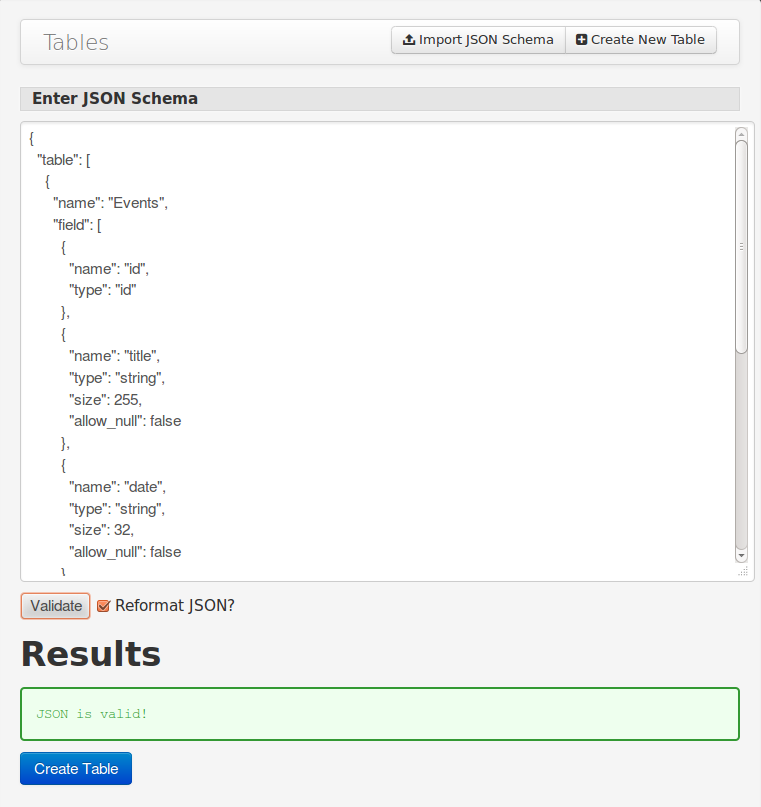
Related tables can be created using the import JSON Schema. Once the JSON is imported press the Create Table
Button. This interface in conjunction with REST and Database API will allow a developer to Alter, Update,
Delete and Create table references.
Package Apps
Applications can be exported from your DSP as a DreamFactory Package. These packages can be shared between other
DSP users, or stored in your version Control System.
To Create your package select Package Apps from the navigation menu then select the Application you would like to
package.
Choose the database schema and the services that will be included in the package file.
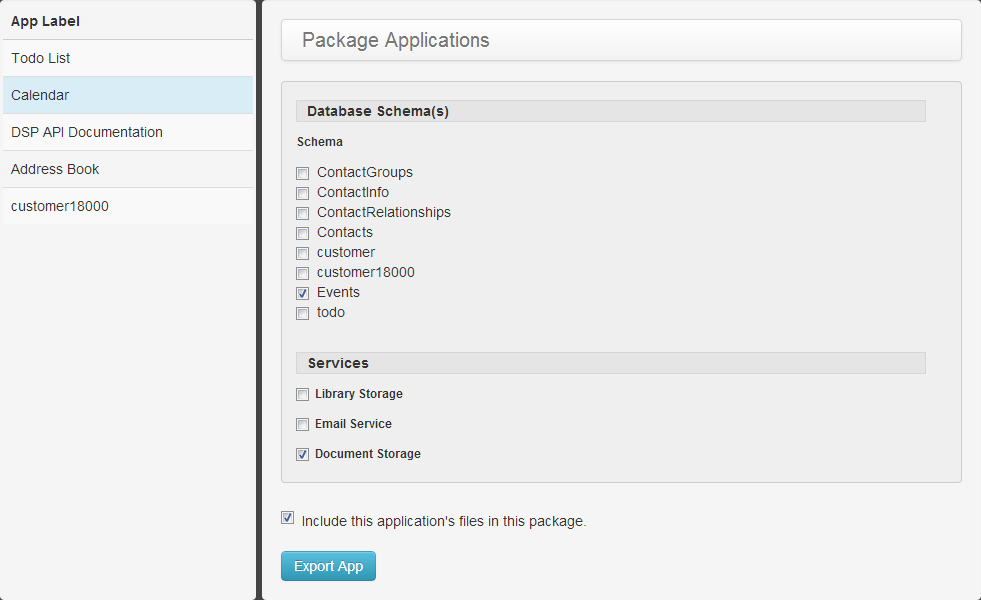
Press the Export App Button. The dfpkg file will be downloaded to your computer.
Importing Package Applications
From the Admin Console Click on Applications in the Navigation Menu. Press the Import New app button.
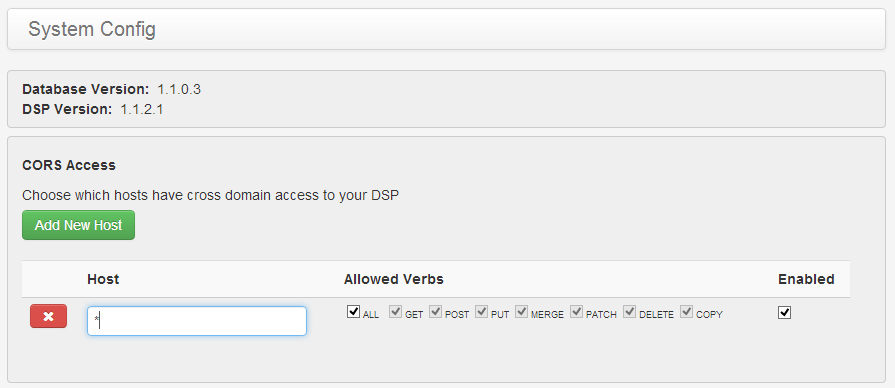
Press the choose file button and locate your .dfpkg file. Once the file is located press the upload button.
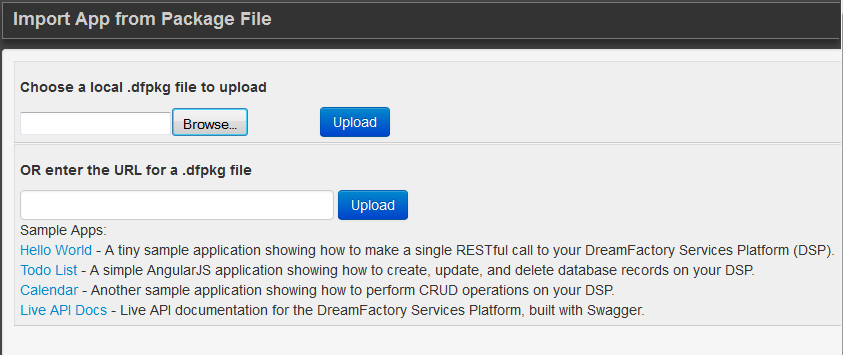
Your Application will now be available in the application drop down list.
System Config
CORS Access
Cross Origin Resource Sharing (CORS) permits browsers to make AJAX requests cross-domain.
To Enable CORS Access in your DSP press the System Config Navigation Menu. Under the CORS Access section press
the New Host button. In the Host name you can enter * to allow access from all hosts, the Hostname or IP address
can also be entered.
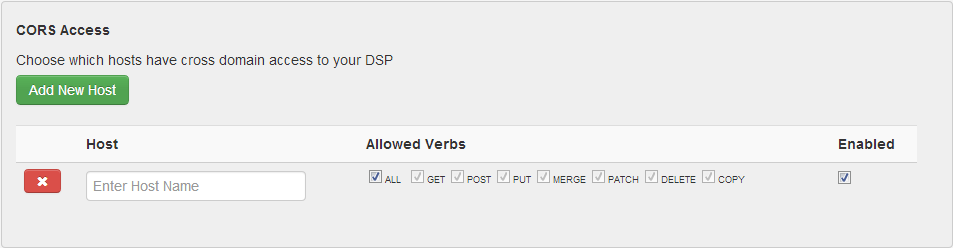
If you would like to restrict which http Verbs can be used by remote server check the appropriate boxes.
Guest Users
Guest Users are used to allow access to DSP applications without having to provide user credentials. This
functionality is useful if an application built inside your DSP needs to be available to users without requiring
registration.
For more information on CORS support please visit
Mozilla Developer Network
To control which applications and resources the guest account can access make sure that the Role assigned to the
guest account is configured with the appropriate permissions. By default this functionality is disabled and must
be setup and configured by an administrator.
When the guest account functionality is enabled the applications assigned to the guest role will be presented on
the DSP Login screen. To login into your DSP click on the Sign In button in the top right corner.
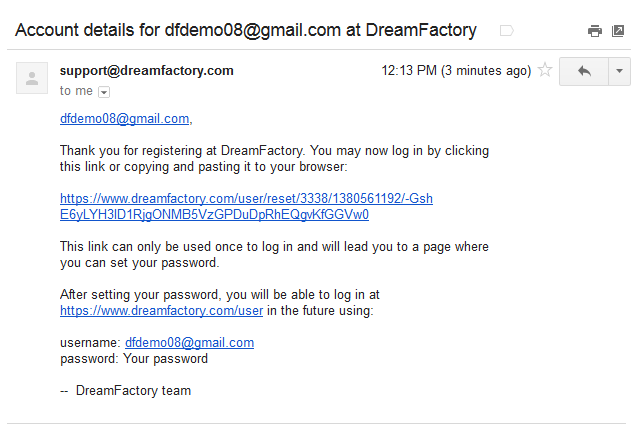
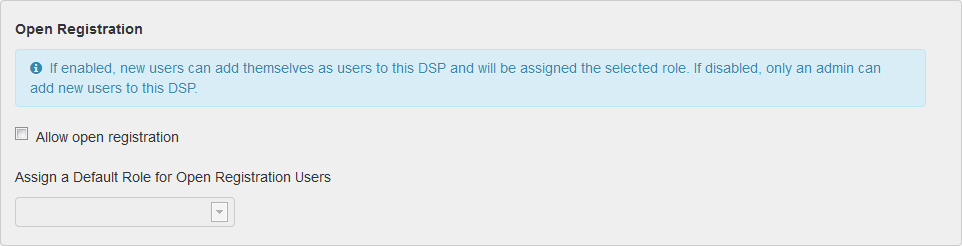
Open Registration
Open Registration allows a user to sign up to access a DSP without being invited by the administrator This means
anyone with the URL can create an account to access the DSP.
To control which applications and resources a open registration user can access make sure that the default role
for open registration is setup with the appropriate permissions. By default this functionality is disabled and
must be setup and configured by an administrator.
To enable Open Registration access the System Config menu in the Admin Console. Check the box marked Allow Open
Registration, Then Select the Default Role for Open registration users and press Save at the bottom of the
screen.
On your DSP login screen there is now a Create Account button in the top right corner. When a user clicks on the
Create Account button they will enter their Email Address, First and Last name, then press register.

An email will be sent which will allow the user to set their password and provide access to the DSP.
DSP in the Cloud
Create a DSP on Windows Azure
Below are the instructions to create a DreamFactory Services Platform™ (DSP) in your Windows Azure account. You
can either create your DSP through the management portal or via the Azure Command Line Tools. We'll cover both
methods here.
If you've just created your Windows Azure account or a new user for your DSP, you'll need to create and upload a
management certificate. If you already have one, just skip the next section.
Creating a Management Certificate
This following information was taken from here.
A Windows Azure management certificate is an X.509 v3 certificate used to authenticate an agent, such as Visual
Studio Tools for Windows Azure or a client application that uses the Service Management API, acting on behalf of
the subscription owner to manage subscription resources. Windows Azure management certificates are uploaded to
Windows Azure and stored at the subscription level. The management certificate store can hold up to 25
certificates. These certificates are used to authenticate your Windows Azure deployment.
Management certificates must have a key length of at least 2048 bits and should reside in thePersonal
certificate store. When the certificate is installed on the client, it should contain the private key of the
certificate. To upload to the certificate to the Windows Azure Management Portal, you must export it as a .cer
format file that does not contain the private key.
Linux
Creating a certificate in Linux is very straightforward. In Ubuntu, it does require the package mono-devel
for the makecert utility. Other flavors of Linux you're on your own at this time.
Installing the mono-devel Package
$ sudoapt-get install mono-devel
The below examples were done on an Ubuntu 12.04.2 LTS machine.
$ makecert -r -n "CN=[certificate-name]" -a sha1 "/path/to/[certificate-name].cer"

Mono MakeCert - version 2.10.8.1X.509 Certificate Builder Copyright 2002, 2003 Motus Technologies. Copyright 2004-2008 Novell. BSD licensed.

Success
Obviously, replace ```[certificate-name]``` with a name of your choosing.
Windows
To create your own self-signed management certificates, open a Visual Studio command prompt and execute the
following command:
makecert -sky exchange -r -n "CN=<CertificateName>" -pe -a sha1 -len 2048 -ss My "<CertificateName>.cer"
For more complete information on generating a certificate, see Create a Service Certificate for
Windows Azure
The private key associated with certificate should be maintained in a secure location. After the .cer file is
uploaded, anyone who has the private key can use the Service Management API to control the hosted service. This
includes creating, deleting, and modifying services and storage accounts on your subscription that areassociated
with certificate.
Using the Management Portal
You must have, or have access to, the following in order to complete this:
- a valid WindowsAzure account
- the WindowsAzure
managementportal - the permissions to create a Virtual Machine
Preparation
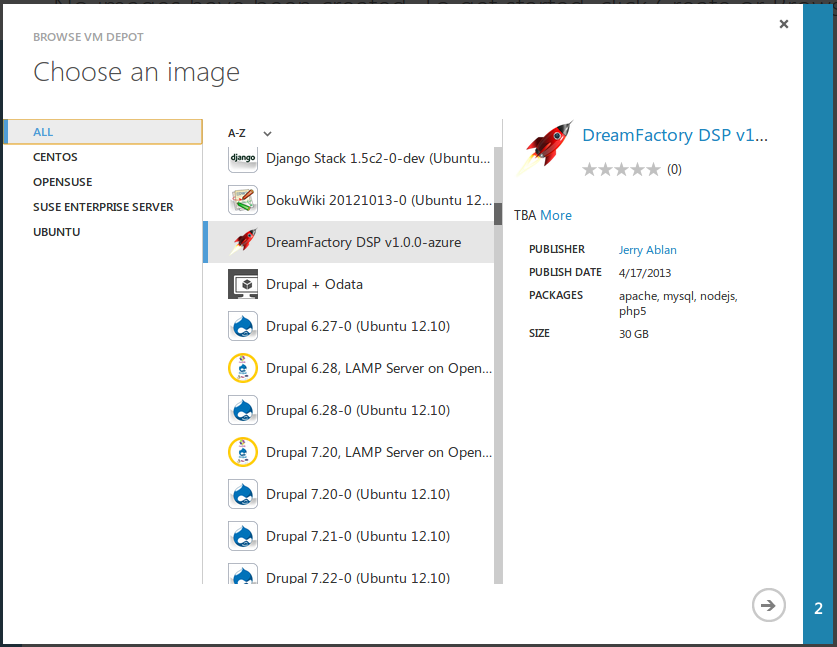
The first step is to pull the DreamFactory Services Platform™ image from the VM Depot into your storage account.
If you've already copied the image to your storage account you may skip this step.
- Go to the Virtual Machines section of your WindowsAzure portal
- Click on the "Images" sub-menu
- Click "Browse VM Depot"
- Search for, and choose, "DreamFactory DSP vx.x.x-azure"
- Choose a storage account, or create one, to house the image and click the check mark
On this panel you choose a name for your new DSP and a user name.
The image is set up with a user called dsp_user already, but you still need to tell Azure about this user.
- In the NEW USER NAME field, type: dsp_user
- In the NEW PASSWORD and CONFIRM fields, type: DSP!User
- Choose a size for your VM. Extra Small is perfect for a test drive.
- Optional: Tick the box next to UPLOAD COMPATIBLE SSH KEY FOR AUTHENTICATION if you wish to
enable SSH public key authentication
- Click the arrow on the bottom to continue.
Virtual Machine Mode
On this panel, simply leave the default standalone machine and choose a DNS name for your DSP. This will
be your public web address to your DSP. The domain for Azure VMs is .cloudapp.net. So if you choose scooby-doo
as your DNS name, you can reach your DSP via http://scooby-doo.cloudapp.net.
After you've entered an acceptable value, click the arrow on the bottom to continue.
Virtual Machine Options
In this last panel of the Azure VM setup wizard, you are able to select an Availability Set. You can
safely ignore this for now and click the check mark on the bottom to create your DSP VM.
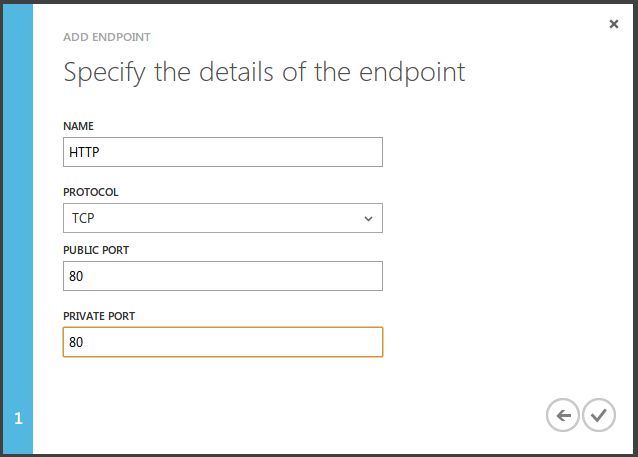
Post Spin-Up Steps
There is one more thing you must do to reach your DSP once it has been created. This is to allow web traffic from
the world into your VM.
To do this, you need to create, what Azure calls, and endpoint.
- Navigate to your new VM's dashboard
- Click the Endpoints submenu, and Add Endpoint" from the footer menu. This will pop up the
endpoint dialog. - See the figure below for what to put in this form
Create a DSP on Amazon EC2
Below are the instructions to create a DreamFactory Services Platform™ (DSP) in your
DSP through the EC2 management console or via the Amazon EC2 Command Line Tools. This guide covers the creating your DSP from the
management console.
Using the EC2 Management Console
Create the VM
Our current Amazon AMI ID is ami-ef583086 .
The AMI ID may
change in the future. Should you feel that this link and ID are not the latest version, simply search the public
images for dsp-ami. Our images will be listed by version. Simply choose the one you want, and continue on
to the next step.
Click the following link to launch a DSP in on Amazon EC2: https://console.aws.amazon.com/ec2/home?region=us-east-1#launchAmi=ami-ef583086
There are a few steps in starting your EC2 instance. They're outlined below.
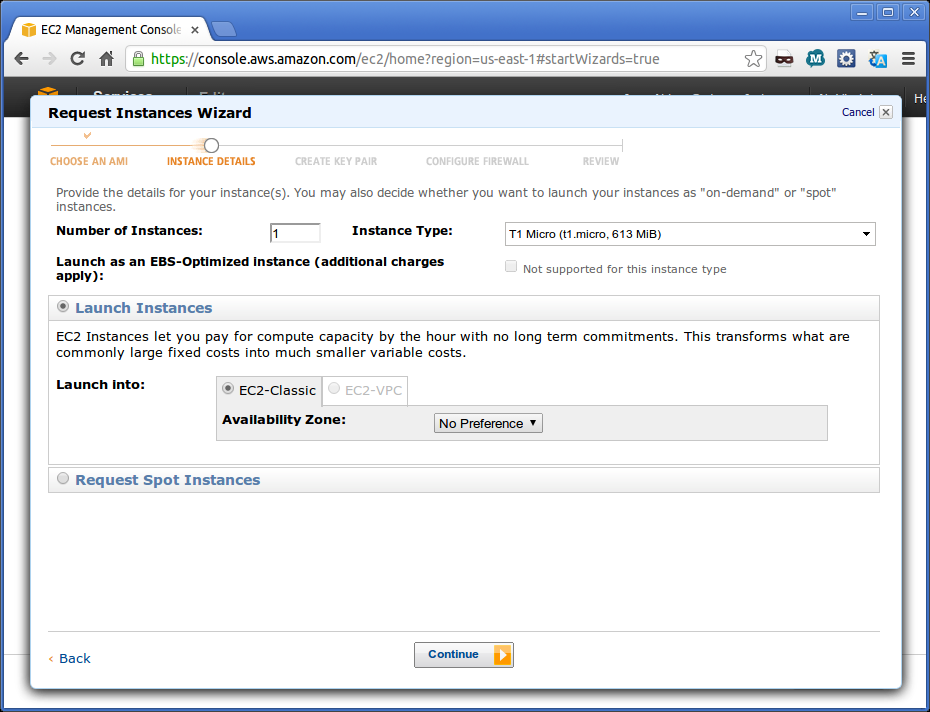
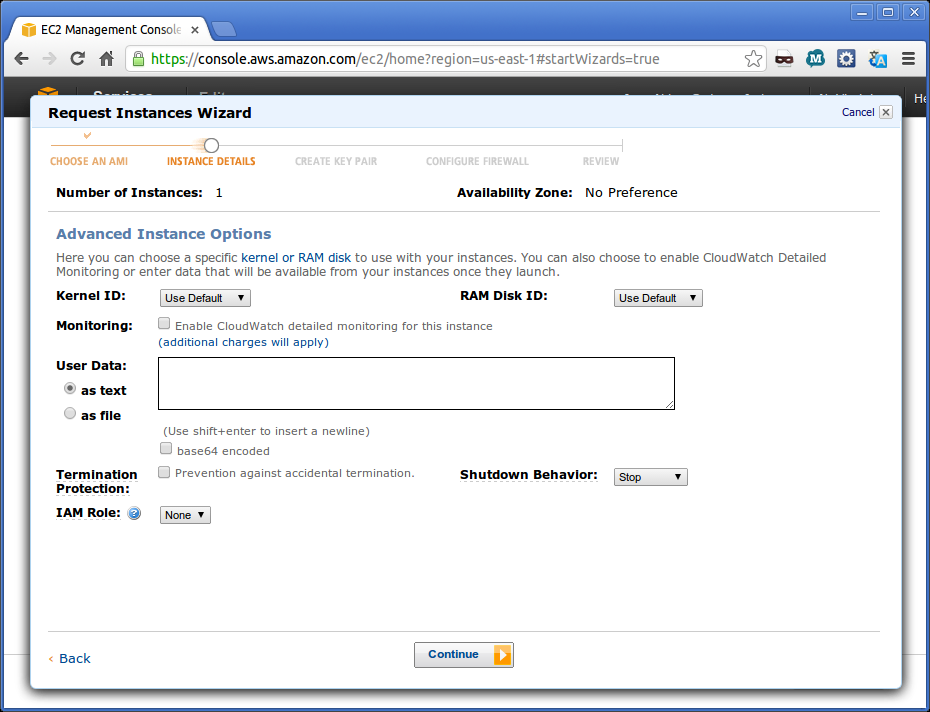
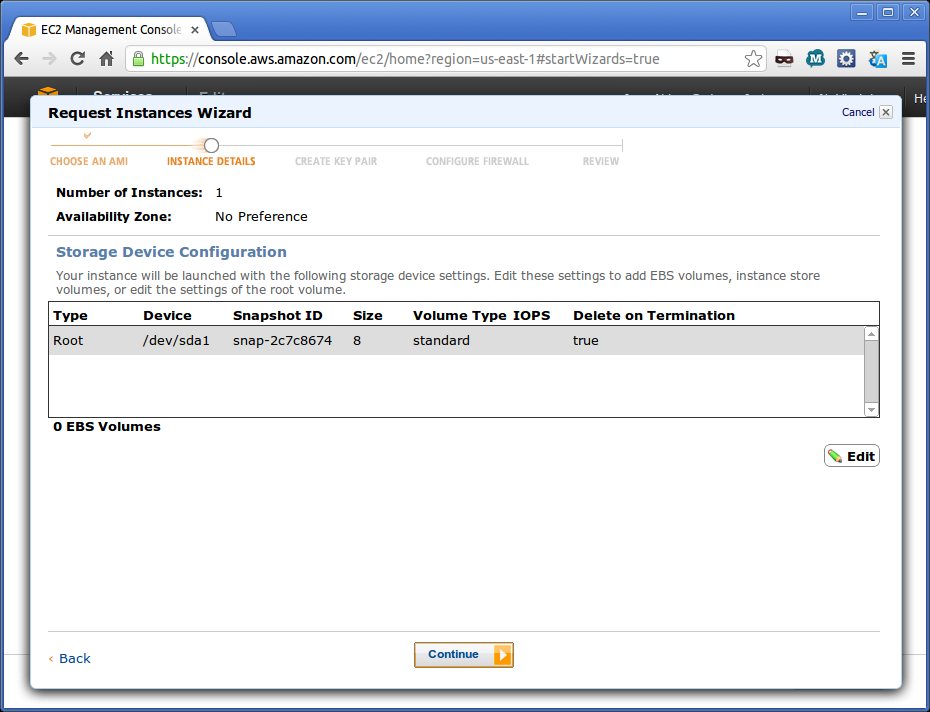
Instance Details
Instance Details is a multi-step panel that allows you to modify the storage layouts for your DSP. You don't have
to do any thing on this panel. Just click Continue until you're on the next step: #Create Key Pair.
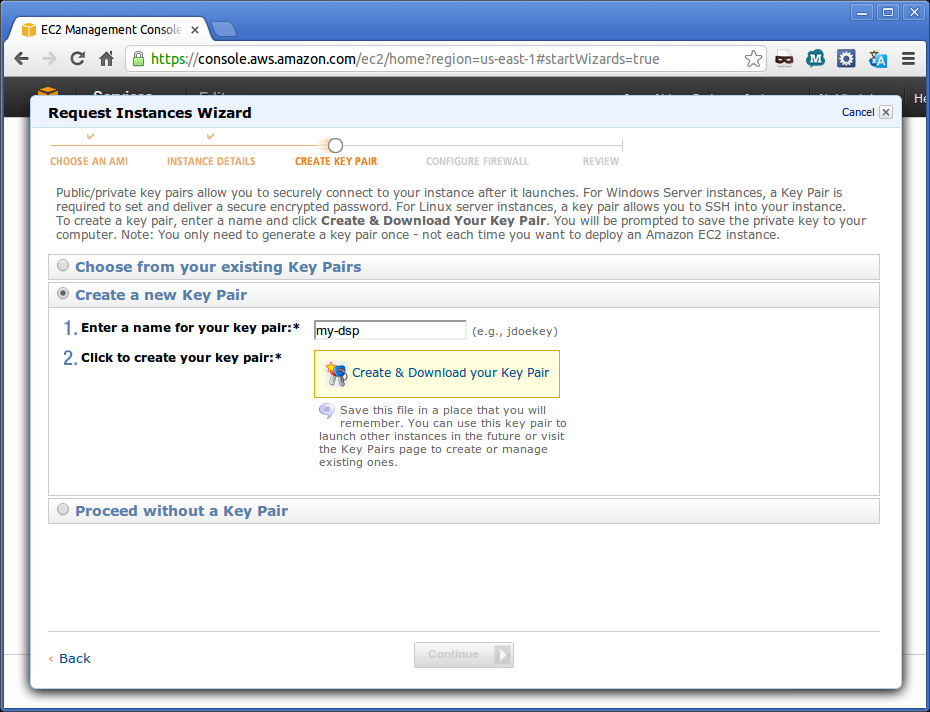
Create Key Pair
In order to access your DSP via SSH you'll need to create an SSH key pair. If you have one in your account you'd
prefer to use, select it and click Continue. If not, read on...
Create a new Key Pair
In order to access your DSP via SSH you'll need to create an SSH key pair. If you have one in your account you'd
prefer to use, select it and click Continue. If not, read on...
Create a new Key Pair
Click on the second section, Create a new Key Pair of the Create Key Pair panel, displaying the
options.
- Enter a name for your key pair.
- Click on the Create & Download your Key Pair link
At this point your private key file will be downloaded to you. Save it to your secret stash of keys, wherever
that is. If you're on a linux system, you'll want to place it in your ~/.ssh directory. Save it to
your-key-name.pem, replacing your-key-name with whatever name you chose in the prior step.
Click the Continue button to configure the firewall.
Using Your Key
Once your DSP is up and running you can SSH into it with the following command on linux and Macs:
$ ssh -i ~/.ssh/your-key-name.pem dsp_user@your-dsp-host-name.compute-1.amazonaws.com
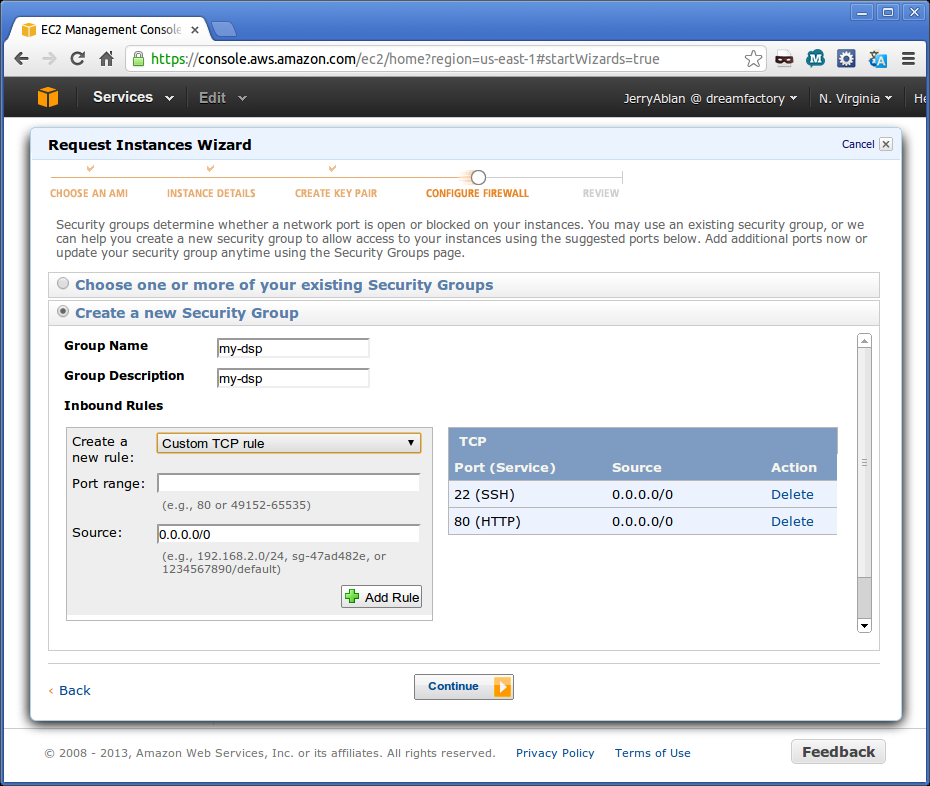
Configure Firewall
By default, all DSPs start up with no ports open. You'll need to open up the SSH and HTTP ports. If you already
have existing security groups defined that you prefer to use, select it from the list and press "Continue". To
create a new security group for the DSP, follow these steps:
- Click the Create a new Security Group section to display the options.
- Enter a Group Name
- Enter a Group Description
- Add the following two rules:
- Select SSH from the Create a new rule dropdown
- Click Add Rule
- Select HTTP from the Create a new rule dropdown
- Click Add Rule
- You should see these rules appear in the list of rules on the right side. If not, try again.
- Click Continue to review your settings
Review and Launch
Finally! After all that furious clicking, one last time. Click the Launch button to begin creating your
DSP.
Once your management console says that it is running, you can proceed to the next step.

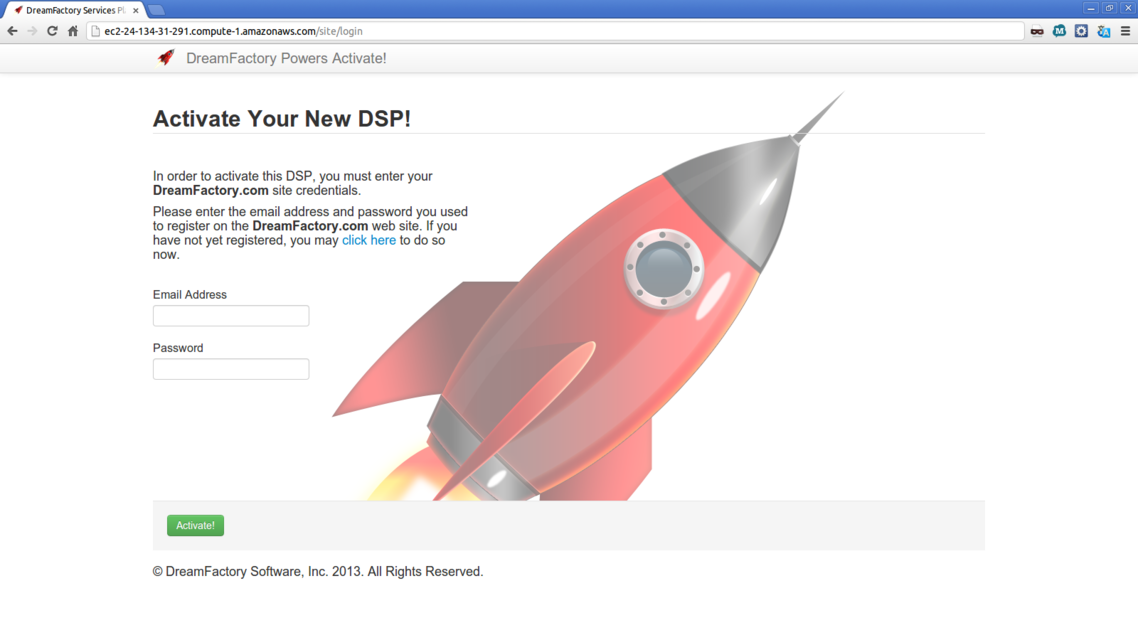
Activate Your DSP
Once your DSP is created, you'll need the IP address or DNS address of the new instance. This can be found on
your EC2 management console.
- From the list of your instances, click on the newly launched DSP instance
- Locate and copy your DNS address
- The DNS address is shown in the bottom pane under the name of the instance. It looks something like
ec2-22-34-65-153.compute-1.amazonaws.com. Your IP address will obviously be different.
- The DNS address is shown in the bottom pane under the name of the instance. It looks something like
- Start your favorite web browser and paste in the DNS address you just copied and go.
If all is well, you should see the DSP Activation page.
Create a DSP VM using Vagrant
From the Vagrant web site:
A Windows Azure management certificate is an X.509 v3 certificate used to authenticate an agent, such as Visual
Studio Tools for Windows Azure or a client application that uses the Service Management API, acting on behalf of
the subscription owner to manage subscription resources. Windows Azure management certificates are uploaded to
Windows Azure and stored at the subscription level. The management certificate store can hold up to 25
certificates. These certificates are used to authenticate your Windows Azure deployment.
Management certificates must have a key length of at least 2048 bits and should reside in thePersonal certificate
store. When the certificate is installed on the client, it should contain the private key of the certificate. To
upload to the certificate to the Windows Azure Management Portal, you must export it as a .cer format file that
does not contain the private key.
Vagrant is a tool for building complete development environments. With an easy-to-use workflow and focus on
automation, Vagrant lowers development environment setup time, increases development/production parity, and
makes the "works on my machine" excuse a relic of the past.
Vagrant was started in January 2010 by Mitchell Hashimoto. For almost three years, Vagrant was a side-project for
Mitchell, a project that he worked on in his free hours after his full time job. During this time, Vagrant grew
to be trusted and used by a range of individuals to entire development teams in large companies.
In November 2012, HashiCorp was formed by Mitchell to back the development of Vagrant full time. HashiCorp builds
commercial additions and provides professional support and training for Vagrant.
Vagrant remains and always will be a liberally licensed open source project. Each release of Vagrant is the work
of hundreds of individuals' contributions to the open source project.
Installation and Setup
Installing and setting up vagrant is beyond
the scope of this guide. However, excellent resources are available on the Vagrant
web site as well as the Google.
You are free to choose the distribution of your preference. Once set up, this guide will diverge to the appropriate
package installation guide a little further down.
Choosing a Distribution
The examples on the vagrant web site use Ubuntu 12.04 LTS mostly, however you're free to choose any operating system
that has a Vagrant Box available. You can even make your own. A list of public Vagrant boxes is available at VagrantBox.es
CentOS/Redhat
Create the VM
This step creates a new VM and downloads the box from Puppet Labs.
First off create a new directory to house your vagrant configuration information:
sandman@dreamfactory$ mkdir centos6
sandman@dreamfactory$ cd centos6
Now tell vagrant to initialize:
sandman@dreamfactory$ vagrant init centos6_dsp http://puppet-vagrant-boxes.puppetlabs.com/centos-64-x64-vbox4210-nocm.box

A Vagrantfile has been placed in this directory.

You are now ready to `vagrant up` your first virtual environment!

Please read the comments in the Vagrant file as well as documentation on `vagrantup.com` for more information on using Vagrant.
This will create a file called Vagrantfile.
We need to make one change to this file. It will tell vagrant to automatically set up a port forward to your DSP.
With the text editor of your choice, edit this file and search for the the following text:
# Create a forwarded port mapping which allows access to a specific port
# within the machine from a port on the host machine. In the example below,
# accessing "localhost:8080" will access port 80 on the guest machine.
# config.vm.network :forwarded_port, guest: 80, host: 8080
And uncomment the last line by removing the hash mark (#):
# Create a forwarded port mapping which allows access to a specific port
# within the machine from a port on the host machine. In the example below,
# accessing "localhost:8080" will access port 80 on the guest machine.
config.vm.network :forwarded_port, guest: 80, host: 8080
Save the changes and start up the VM:
sandman@dreamfactory$ vagrant up
Bringing machine 'default' up with 'virtualbox' provider...
[default] Box 'centos6_dsp' was not found. Fetching box from specified URL for
the provider 'virtualbox'. Note that if the URL does not have
a box for this provider, you should interrupt Vagrant now and add
the box yourself. Otherwise Vagrant will attempt to download the
full box prior to discovering this error.
Downloading or copying the box...
Extracting box...te: 2017k/s, Estimated time remaining: --:--:--)
Successfully added box 'centos6_dsp' with provider 'virtualbox'!
[default] Importing base box 'centos6_dsp'...
[default] Matching MAC address for NAT networking...
[default] Setting the name of the VM...
[default] Clearing any previously set forwarded ports...
[default] Creating shared folders metadata...
[default] Clearing any previously set network interfaces...
[default] Preparing network interfaces based on configuration...
[default] Forwarding ports...
[default] -- 22 => 2222 (adapter 1)
[default] -- 80 => 8080 (adapter 1)
[default] Booting VM...
[default] Waiting for VM to boot. This can take a few minutes.
[default] VM booted and ready for use!
[default] Configuring and enabling network interfaces...
[default] Mounting shared folders...
[default] -- /vagrant
This creates a virtual machine based on the box that was just downloaded. SSH is available on port 2222 and a user
named vagrant with a password of vagrant has been created that has sudo privileges.
Now connect to your new VM to make sure everything's cool:
sandman@dreamfactory$ vagrant ssh
Last login: Sun Apr 14 22:24:07 2013
Welcome to your Vagrant-built virtual machine.
vagrant@precise32:~$
Configuring the VM
Now that the VM is created, we need to install the dependencies for the DSP package. These are detailed on the RPM
package installation guide. Please install and enable the EPEL repository, it'll look similar, if not exactly like,
the following:
vagrant@precise32:~$ sudo apt-get install curl apache2 php5 php5-common php5-cli php5-curl php5-mcrypt php5-gd
                        php5-mysql mysql-server mysql-client
Please Note: The actual version and iteration numbers may vary as they will increase over time.
Connect to MySQL and create a database and database user for the DSP. Please note, this example assumes that you did
not assign a password to the MySQL root user during the above installation. If you did, you have to add a -p
to the command line below.
vagrant@precise32:~ $ mysql -u root
Welcome to the MySQL monitor.  Commands end with ; or \g.
Your MySQL connection id is 41
Server version: 5.5.31-0ubuntu0.12.04.2 (Ubuntu)

Copyright (c) 2000, 2013, Oracle and/or its affiliates. All rights reserved.

Oracle is a registered trademark of Oracle Corporation and/or its affiliates. Other names may be trademarks of their respective owners.

Type 'help;' or '\h' for help. Type '\c' to clear the current input statement.

mysql> create database dreamfactory;
Query OK, 1 row affected (0.00 sec)

mysql> grant all privileges on dreamfactory.* to 'dsp_user'@'localhost' identified by 'dsp_user';
Query OK, 0 rows affected (0.00 sec)

mysql> exit
Bye
At this point your VM is now configured and ready to install the DSP system.
Installing the DreamFactory Services Platform™
Grab a copy of the latest release from the release package repository. As of this writing, the current DSP version is
1.0.4.
vagrant@precise32:~$ wget
                        https://raw.github.com/dreamfactorysoftware/platform-packages/1.0.4/dreamfactory-dsp_1.0.6-1_all.deb
And install it:
vagrant@precise32:~$ sudo dpkg -i dreamfactory-dsp_1.0.6-1_all.deb
The package also runs the DSP install/update script. This sets up the directories and loads all non-system
dependencies for you. It will take awhile on the stock vagrant VM as the memory footprint is quite small.
There is one final thing that must be done. Because the packages are meant to be installed on systems that may or may
not have other software, this package does not replace the default web site installed with the Apache web server. If
this is a fresh install, you must disable the Apache default web site so the DSP will become the default web
site.
To disable the default Apache web site, do the following:
vagrant@precise32:/etc/apache2/sites-enabled$ sudo a2dissite 000-default
Site default disabled.
To activate the new configuration, you need to run:
    service apache2 reload
vagrant@precise32:/etc/apache2/sites-enabled$ sudo service apache2 reload
* Reloading web server config apache2
apache2: Could not reliably determine the server′s fully qualified domain name, using 127.0.1.1 for ServerName
That last bit about reliably determining the server's name, don't worry about it.
The DSP is completely installed with all dependencies and ready for use.
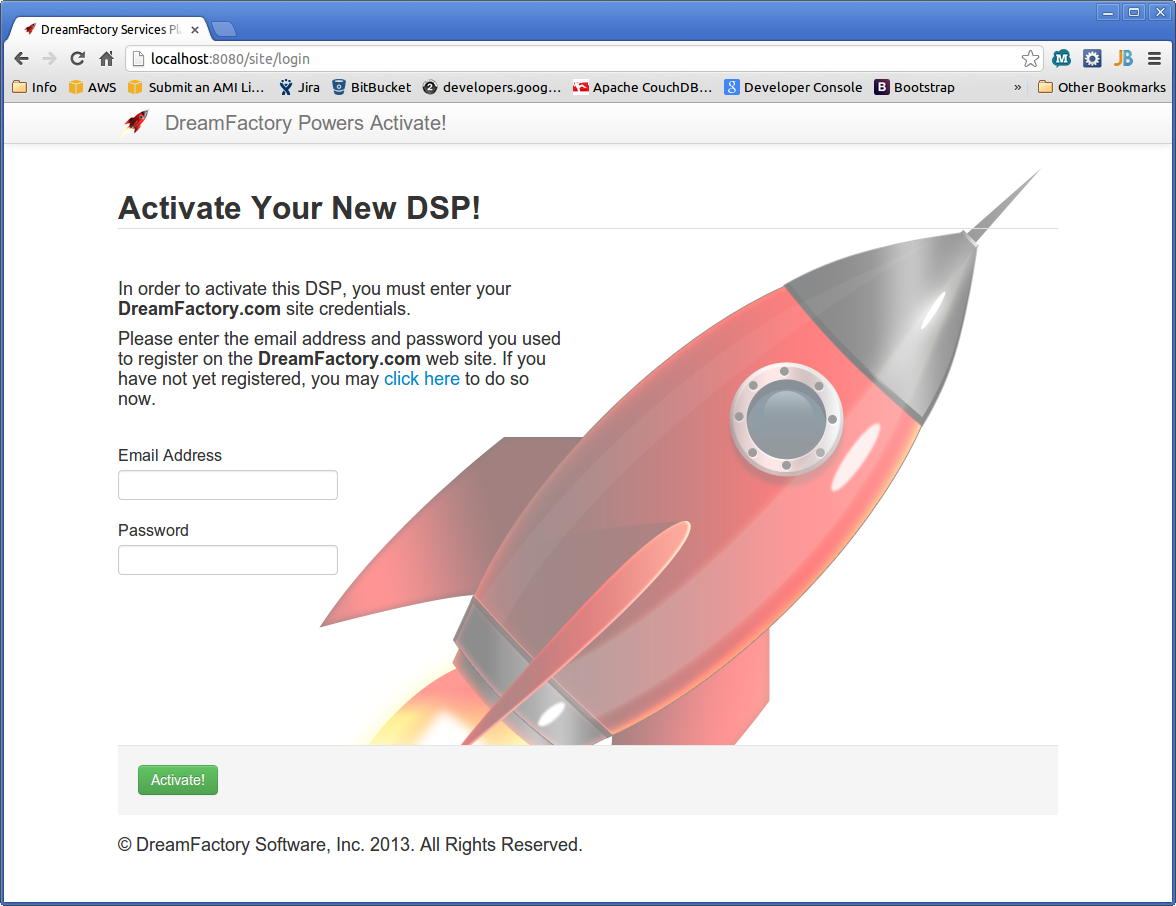
Open you favorite browser and go to http://localhost:8080/.
This is the URL for the DSP we just installed.
Debian or Ubuntu System
Below are the instructions to create the DreamFactory Services Platform™ (DSP) on an existing
Debian/Ubuntu system. Obviously, it is assumed that you have root access to said machine and it is
operational.
Procurement
You'll need a copy of the latest package from the official DreamFactory
DSP repository. There are also versions for CentOS and Redhat in the repository. You can also download
the image by doing the following on your system:
$ wget https://github.com/dreamfactorysoftware/platform-packages/raw/master/dreamfactory-dsp_1.1.2-0_all.deb
Prerequisites
If you are upgrading an existing installation, you may skip this section. This is only for new
installations.
The DreamFactory Services Platform™ requires the following packages to run:
- curl
- apache2
- php5
- php5-common
- php5-cli
- php5-curl
- php5-mcrypt
- php5-gd
- php5-mysql
- mysql-server
- mysql-client
- git
Installation
Once you've procured the package, it needs to be installed. If you are upgrading, the package manager will
automatically upgrade your existing installation, otherwise it will install a fresh copy.
To install or upgrade the package, type the following:
$ sudo dpkg -i dreamfactory-dsp_1.1.2-0_all.deb
CentOS or Redhat System
Below are the instructions to create t172.1he DreamFactory Services Platform™ (DSP) on an existing
CentOS or Redhat system. Obviously, it is assumed that you have root access to said machine and it is
operational.
Procurement
You'll need a copy of the latest package from the official DreamFactory
DSP repository. There are also versions for Debian and Ubuntu in the repository. You can also download
the image by doing the following on your system:
$ wget https://github.com/dreamfactorysoftware/platform-packages/raw/master/dreamfactory-dsp-1.1.2-0.noarch.rpm
Prerequisites
If you are upgrading an existing installation, you may skip this section. This is only for new
installations.
The DreamFactory Services Platform™ requires the following packages to run:
- curl
- httpd
- php
- php-common
- php-cli
- php-curl
- php-mcrypt
- php-gd
- php-mysql
- php-posix
- mysql-server
- git
Please note that the php-mcrypt package isn't available is some package repositories. If this is the
case, you can add the RHEL
EPEL repository to your sources list. Instructions for doing this are available here.
Configuring Your System
[thedude@localhost:~]$ sudo yum install curl httpd php php-common php-cli php-curl php-mcrypt php-gd php-mysql mysql-server
Installation
Once you've procured the package, it needs to be installed. If you are upgrading, the package manager will
automatically upgrade your existing installation, otherwise it will install a fresh copy.
To install or upgrade the package, type the following:
$ sudo rpm -Uvh dreamfactory-dsp-1.1.2-0.noarch.rpm
Dreamfactory Service Platform

Tidak ada komentar:
Posting Komentar
Silahkan tulis komentar anda disini, bisa berupa: Pertanyaan, Saran, atau masukan/tanggapan.