Tampilkan postingan dengan label Blogger Widgets. Tampilkan semua postingan

Minggu

Recent Comments Widget For Blogger


This is icon for social networking website. Th...
This is icon for social networking website. This is part of Open Icon Library's webpage icon package. (Photo credit: Wikipedia)

The Recent Comments Widget for Blogger displays the recent blog comments
on your blog's sidebar, showing a snippet of the last comments along
with the title of the post to which the comment was made. If you want to
encourage your readers in leaving comments on your blog, this is a
widget I would recommend.


How To Install The Recent Comments Widget For Blogger


Step 1. Go to your Blogger Dashboard >> Layout >> Add a Gadget


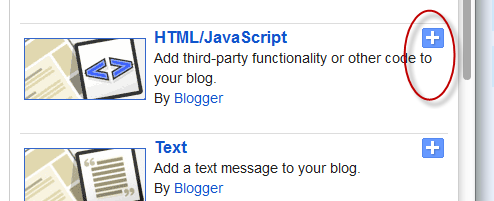
Step 2. From the pop-up window, scroll down and choose the HTML/JavaScript option:


Step 3. Now copy and paste the below code in the HTML/JavaScript box:


<script style=text/javascript
src="http://helplogger.googlecode.com/svn/trunk/recent comments
widget.js"></script><script style=text/javascript >var
a_rc=5;var m_rc=false;var n_rc=true;var
o_rc=100;</script><script src=http://your-blog-name.blogspot.com/feeds/comments/default?alt=json-in-script&callback=showrecentcomments
></script><span id=rcw-cr><a
href=http://helplogger.blogspot.com/2012/03/recent-comments-widget-for-blogger.html>Recent
Comments Widget</a></span><style type=text/css>
.rcw-comments a {text-transform: capitalize;} .rcw-comments
{border-bottom: 1px dotted; padding-top: 7px!important; padding-bottom:
7px!important;} #rcw-cr {font-family:
Arial,Tahoma;font-size:9px;padding-top:7px;display:block;}
</style>


Step 4. Replace your-blog-name with your blog url.


Step 5. Click Save and you're done.


Hope you'll enjoy it!


Sabtu

Membuat Widget Related Posts dengan Thumbnail pada Blogger


Cara menambahkan Widget Related Posts dengan Thumbnail pada Blogger

Sekarang di sini adalah cara yang mudah untuk menampilkan posting terkait di bawah setiap posting blog Anda, bersama dengan thumbnail. Artikel-artikel terkait dipilih dari pesan lainnya dalam kategori yang sama / label / tag. Dengan cara ini banyak pembaca Anda akan tetap di blog Anda untuk waktu yang cukup lama ketika mereka melihat posting terkait kepentingan.


related post, related posts blogger, blogger widgets


Langkah menambahkan Widget Related Posts ke Blogger / Blogspot


Langkah 1. Buka Blogger Dashboard >> Template >>Edit HTML;


Langkah 2. Centang pada "Expand widgets template" box;


Langkah 3. Cari (CTRL + F) kode <head> dibawah ini:


</head>


Langkah 4. Copy dan paste kode di bawah ini sebelum / di atas </head>


<!--Related Posts with thumbnails Scripts and Styles Start-->

<!-- remove --><b:if cond='data:blog.pageType == &quot;item&quot;'>

<style type='text/css'>

#related-posts {

float:center;

text-transform:none;

height:100%;

min-height:100%;

padding-top:5px;

padding-left:5px;

}


#related-posts h2{

font-size: 18px;

letter-spacing: 2px;

font-weight: bold;

text-transform: none;

color: #5D5D5D;

font-family: Arial Narrow;

margin-bottom: 0.75em;

margin-top: 0em;

padding-top: 0em;

}

#related-posts a{

border-right: 1px dotted #DDDDDD;

color:#5D5D5D;

}

#related-posts a:hover{

color:black;

background-color:#EDEDEF;

}

</style>

<script type='text/javascript'>

var defaultnoimage=&quot;https://blogger.googleusercontent.com/img/b/R29vZ2xl/AVvXsEj8Q4EGKs2KMqqTOf8ebDfs1ttdoalqEsqa7jmMxMMcUjnm_vsgYvZ9gDmDBzSjuclRFuvW_tmAHGuRHPHBl0jxcD2PlWor6ME2Zv0ceJC5GP5RfgWY-fh-8FOqWfCpOKht54qHaIIhWna2/s1600/no_image.jpg&quot;;

var maxresults=5;

var splittercolor=&quot;#DDDDDD&quot;;

var relatedpoststitle=&quot;Related Posts&quot;;

</script>

<script src='http://helplogger.googlecode.com/svn/trunk/related-posts-with-big-thumbnails.js' type='text/javascript'/>

<!-- remove --></b:if>

<!--Related Posts with thumbnails Scripts and Styles End-->


Note:

- to change the default picture, replace the URL in blue with your own

- for displaying more than 5 posts, replace 5 value from "var maxresults=5;"

- remove the code in violet if you want the related posts to be displayed in homepage too

Catatan:
- Untuk mengubah gambar default, ganti
URL yang berwarna biru dengan link gambar yang Anda miliki
- Untuk menampilkan lebih dari
5 posting, ganti 5 nilai dari  "var maxresults=5;"
- Hapus
kode yang berwarna violet/ungu jika Anda ingin menampilkan widget ini dalam homepage juga


Langkah 5. Sekarang cari kode berikut:


    <div class='post-footer'>


Langkah 6. Dan tepat di atasnya, copy dan paste kode di bawah ini:


<!-- Related Posts with Thumbnails Code Start-->

<!-- remove --><b:if cond='data:blog.pageType == &quot;item&quot;'>

<div id='related-posts'>

<b:loop values='data:post.labels' var='label'>

<b:if cond='data:label.isLast != &quot;true&quot;'>

</b:if>

<script expr:src='&quot;/feeds/posts/default/-/&quot; +
data:label.name +
&quot;?alt=json-in-script&amp;callback=related_results_labels_thumbs&amp;max-results=6&quot;' type='text/javascript'/></b:loop>

<script type='text/javascript'>

removeRelatedDuplicates_thumbs();

printRelatedLabels_thumbs(&quot;<data:post.url/>&quot;);

</script>

</div><div style='clear:both'/>

<!-- remove --></b:if>

<b:if cond='data:blog.url == data:blog.homepageUrl'><b:if cond='data:post.isFirstPost'>

<a href='http://helplogger.blogspot.com'><img alt='Blogger
Tricks'
src='https://blogger.googleusercontent.com/img/b/R29vZ2xl/AVvXsEhgJaNgGXiE2fRakkiuqHIpbMDX_WUFqQeUpfb7GZKjrTakroInsGCb4Ys8-6h08gSMQP0JoC-KU7EDNdhZIiWb8ndC3hFd-T1pPWxWCxm-RbXy0d8AEKVwj0PUkFHyJ7Tr-NqhSAS3OpWS/s1600/best+blogger+tips.png'/></a>

</b:if></b:if>

<!-- Related Posts with Thumbnails Code End-->


Note:

- change the 6 value from max-results=with the number of posts you want to be displayed.

- If you want the related posts to be displayed on homepage too, remove the code in violet.


Catatan:
- Ubah nilai
6 dari  max-results=6 dengan jumlah posting yang ingin ditampilkan.
- Jika Anda ingin
related post  ini ditampilkan pada homepage juga, hapus kode warna  violet/ungu.


Langkah 7. Simpan Template


Enjoy :)


Credit goes to: bloggerpluggins.org . Modified by kivandanu


Senin

Automatic Recent Posts Slider With jQuery For Blogger


Now save your template.


Step 3 -Adding The Gadget


  • Now go to Page Layout

  • Add a Gadget > HTML/JavaScript

  • Paste below piece of code and save it.


  • Now replace yourblog.blogspot.com with your own blog url.[Code Line - 10] (Only change blog URL don't change any other things.

  • To change number of post find this var numposts_gal = 6; line in above code. (Code Line - 4)

  • If you want to change number of characters to show in description find this piece of code var numchars_gal = 150; (Code Line - 5)


Now save your all the changes and you are done.Visit your blog to see this beautiful slide.


Follow this tutorial to show this gadget only on specific page or only in homepage.


Your questions,queries and feedback are always welcome.Also if you need any help about customizing this gadget then feel free to ask me.I'll glad to help you.


Good day....

By: http://www.helperblogger.com/


Automatic Recent Posts Slider With jQuery For Blogger


Recent posts slider is a best way to show of you blog's recent posts as a slide show.You may see the slider such slider in many wordpress blogs but when coming to blogger it is certainly not much seen.This widget is shared by Abu-Farhan and using my own tricks further I customized this plugin to works perfect with your blog.If you are thinking that customization's will be hard then you are wrong,this gadget is very easy to customize and very easy to add.You don't need to add images,text or any links like other sliders all is Automatic :D.  Here I am giving a tutorial about adding recent post slider to blogger.First take a preview on slider.


Live Demo ▼


How To Add This Slider To Blogger?


Step 1 - Applying Styles


  1. Go to Blogger Dashboard > Design > Edit HTML. (In new User Interface It Is - Dashboard > Template)
  2. As always download a copy of your template first.
  3. Now find for ]]></b:skin>
  4. Add below code just before ]]></b:skin>


/* START EasySlider By helperblogger.com */

#slide-container {
height: 360px;
position: relative;
width: 480px;
}

#slider {
height: 360px;
left: 25px;
overflow-x: hidden;
overflow-y: hidden;
position: relative;
width: 480px;
font-family: calibri;
}

.slide-desc {
background: transparent url(http://i195.photobucket.com/albums/z105/dantearaujo/darkbg.png) repeat scroll 0 0;
color: #FFFFFF;
padding: 10px;
position: absolute;
right: 0px;
text-align: left;
top: 0;
width: 200px;
z-index: 99999;
}

.slide-desc h2 {
display: block;
}

.crosscol .widget-content {
position: relative;
}

#slider ul, #slider li,

#slider2 ul, #slider2 li {
margin: 0;
padding: 0;
list-style: none;
}

#slider2 {
margin-top: 1em;
}

#slider li, #slider2 li {
/*

define width and height of list item (slide)

entire slider area will adjust according to the parameters provided here

*/
width: 480px;
height: 360px;
overflow: hidden;
}

#prevBtn, #nextBtn,

#slider1next, #slider1prev {
display: block;
width: 30px;
height: 77px;
position: absolute;
left: -30px;
text-indent: -9999px;
top: 71px;
z-index: 1000;
}

#nextBtn, #slider1next {
left: 520px !important;
}

#prevBtn, #nextBtn, #slider1next, #slider1prev {
display: block;
height: 77px;
left: 0;
position: absolute;
top: 132px;
width: 30px;
z-index: 1000;
}

#prevBtn a, #nextBtn a,

#slider1next a, #slider1prev a {
display: block;
position: relative;
width: 30px;
height: 77px;
background: url(http://i195.photobucket.com/albums/z105/dantearaujo/prev.png) no-repeat 0 0;
}

#nextBtn a, #slider1next a {
background: url(http://i195.photobucket.com/albums/z105/dantearaujo/next.png) no-repeat 0 0;
}

/* numeric controls */

ol#controls {
margin: 1em 0;
padding: 0;
height: 28px;
}

ol#controls li {
margin: 0 10px 0 0;
padding: 0;
float: left;
list-style: none;
height: 28px;
line-height: 28px;
}

ol#controls li a {
float: left;
height: 28px;
line-height: 28px;
border: 1px solid #ccc;
background: #DAF3F8;
color: #555;
padding: 0 10px;
text-decoration: none;
}

ol#controls li.current a {
background: #5DC9E1;
color: #fff;
}

ol#controls li a:focus, #prevBtn a:focus, #nextBtn a:focus {
outline: none;
}

/* END EasySlider By helperblogger.com */


You can edit above CSS values as you wish.You may use our HTML Editor to see a live preview of your changes.(Note - If you are editing this gadget in HTML Editor then you have to add all three codes simultaneously in editor)


Step 2 - Adding JavaScript


  • Now find for </body> tag
  • Add below code just after/below </body> tag.


<!-- Start easy content slider by helperblogger.com -->
<script src='http://ajax.googleapis.com/ajax/libs/jquery/1.6/jquery.min.js' type='text/javascript'></script>
<script src='http://accordion-template.googlecode.com/svn/trunk/easySlider1.7.js' type='text/javascript'></script>
<script type='text/javascript'>
//<![CDATA[
$(document).ready(function(){
$("#slider").easySlider({
auto: true,
continuous: true
});
});
//]]>
</script>
<!-- End easy content slider by helperblogger.com -->


Now save your template.


Adding The Gadget

  • Now go to Page Layout
  • Add a Gadget > HTML/JavaScript
  • Paste below piece of code and save it.


<div id="slider">
<script style="text/javascript" src="http://code.helperblogger.com/easySlider.min.js"></script>
<script style="text/javascript">
var numposts_gal = 6;
var numchars_gal = 150;
var random_posts = false; // random posts
</script>
<!-- replace with your web address (marked with red color) -->
<script src="http://yourblog.blogspot.com/feeds/posts/default?orderby=published&alt=json-in-script&callback=showgalleryposts&max-results=999999"></script>
</div>


  • Now replace yourblog.blogspot.com with your own blog url.[Code Line - 10] (Only change blog URL don't change any other things.


  • To change number of post find this var numposts_gal = 6; line in above code. (Code Line - 4)


  • If you want to change number of characters to show in description find this piece of code var numchars_gal = 150; (Code Line - 5)
Now save your all the changes and you are done.Visit your blog to see this beautiful slide.


Follow this tutorial to show this gadget only on specific page or only in homepage.


Your questions,queries and feedback are always welcome.Also if you need any help about customizing this gadget then feel free to ask me.I'll glad to help you.
Good day....
By: http://www.helperblogger.com/

MAKNA SPIRITUAL DAN FILOSOFIS HANACARAKA: KAJIAN KEBATINAN JAWA DALAM PERSPEKTIF

  MAKNA SPIRITUAL DAN FILOSOFIS HANACARAKA: KAJIAN KEBATINAN JAWA DALAM PERSPEKTIF MAHASISWA   Disusun untuk memenuhi tugas mata kuliah Fils...